International Women's Day, that is, the eighth of March, is traditionally associated with tulips. And indeed, what other representatives of the flora can be even more “beautiful spring” than these royal flowers?
Where to start making a paper tulip?
You probably remember from school how you made similar flowers from paper. The technique seemed simple and accessible to you, although some may not have been able to handle it. Today you can teach this to your child. And we will remind you how to make this simple, laconic, and at the same time beautiful craft.
Let your baby give his mother an armful of paper tulips - what could be sweeter to a mother’s heart?
How to make a tulip out of paper? Very simple! To do this, you don't even need to glue or stitch anything. And we will work in the Japanese minimalist origami technique - exactly the one that was taught to us from school in fine arts lessons.
True, at that time this name was not yet so widespread, and therefore the finished craft was simply called a paper tulip, or a paper tulip.
Since the creation of such works was carried out back in school, you yourself understand that the level of complexity of this craft is almost zero. And it will be a great start for the development of artistic or sculpting skills in your child. The equipment we have prepared is quite suitable for teaching four- and five-year-olds. So you can take it on board and “teach” it to your own child. So, how to make a paper tulip with your own hands?
Tools for paper tulips
Since the word “paper” appears in the name itself, it’s not difficult to guess what we will use to create origami. However, since the choice of colored paper and cardboard today is extremely large, we decided to give you some advice on the correct selection of suitable raw materials.
It is believed that truly high-quality paper must be thick. And this is true - few can argue with this. However, we strongly do not recommend that you purchase cardboard or anything like it for origami. It will be much more difficult for you to make a craft from this material, and even more so it will not be easy for your child, who is encountering this type of work for the first time.
But you shouldn’t rush from one extreme to another either. The paper for your craft should not be too soft, thin or rough; newspaper inclusions should not be visible in the light. In a word, it is also not recommended to buy very cheap and low-quality paper like copier paper. Ideally, it should be moderately dense, uniform in structure, fairly smooth, but not entirely glossy.
The thinness of the paper can be easily checked with a marker - just draw one line on the front side of the sheet and look at its back side. The more contrast the print turns out, the thinner the paper you purchased. It will be easier to work with, but such raw materials have their undeniable disadvantages. At a minimum, it cannot properly fix the product, and therefore you will not be able to put your beloved child’s craft in a vase and enjoy it for a long time.
For a tulip flower you will need paper of two tones - actually, the color of the base (bud) and the color of the stem. Use your own discretion here and buy the shade that you like.
It is better not to take too bright, saturated, poisonous or acidic shades - this will make the flower unnatural. Although, those who prefer stylization prefer just such products.
You can make a tulip from white paper, but in this case the flower will be too simple. On the other hand, you can color it with your baby and develop his talent even more.
Origami is a technique that practically does not tolerate the presence of glue, this is its main “trick”. But when connecting the bud to the stem, you may still need glue. To make the fixation as strong, reliable and durable as possible, use appropriate adhesive materials - for example, the well-known “Moment”.
So, you will need:
- A sheet of paper in A4 format (pink, red, blue, yellow, purple or any other color at your personal discretion);
- A sheet of A4 paper (lettuce, pistachio, olive or grass green);
- Glue (PVA, “Moment” or any other, according to your preference);
- Scissors or stationery knife;
- Pencil (for making a flower stem).
If you have already figured out the materials and tools, it’s time to start studying the diagram of how to make a tulip out of paper.
paper tulip making technology
How to make an origami tulip?
This task is very simple, and even a preschool child can cope with it, of course, under your guidance, control and supervision. We just want to remind you that in addition to a creative impulse, you will need perseverance, patience, and, of course, accuracy.
The diagram of how to make a tulip from colored paper is extremely simple. However, you need not to deviate from the instructions and not engage in amateur activities - something, and the origami technique does not tolerate this at all.
So let's get started:
Having made the main part of the product, that is, in fact, the bud, almost all beginners ask themselves the question of how to make a stem and attach a flower to it to complete the work? Making the stems is very simple. But first you must turn the bud over and find a tiny hole at its bottom. It will help not only create communication with the stem, but also “bloom” your flower. To make the tulip more magnificent, simply blow into the perforated hole. Do this as carefully as possible, without effort.
In making the rod, you can take the simplest route - simply wrap the pencil with green paper, then slightly flatten the tip of the simulated stem, making it moderately sharp, spread it with glue and insert it into the hole. But you can do something a little more complicated and prepare a stem with a leaf, made in a typical origami style. We recommend you the second option, since it will not bring disharmony to the overall visual perception of your product.
Step-by-step instructions for making a stem with a leaf:
When making origami crafts, try to apply moderate pressure on the folds, not too much, so as not to spoil your work.
Flowers are considered an integral part of every interior, as they create coziness in the home. In addition, they are an excellent gift for any occasion. Live tulips, especially in the autumn-winter period, are very expensive, and they fade almost the next day. Therefore, in order to add spring notes to the overall atmosphere, we will tell you how to make a tulip from paper. This is a very original solution, and the process of making it will give you a lot of pleasure.
We make tulips using the origami technique
A flower made using the origami technique in eastern countries symbolizes natural unity, since each bud or petal is made exclusively from a single leaf. Such flowers can simply be placed in a vase in the form of a bouquet, or you can use them to decorate boxes or cards. In order to please yourself and your loved ones, you can make a paper tulip with your own hands using the following methods.
Important! Do not forget that despite the apparent simplicity of the origami technique, which originated in Japan, it is not as simple as it seems. Therefore, try not to immediately take on heavy patterns, but start everything by making the simplest and most basic crafts.
Method number 1. “I myself”:
- Take a square sheet and fold it diagonally, giving it a triangle shape. Mark the middle.
- Next, you need to attach the right and left petals to the formed middle so that a clove is formed. You should end up with a bud with three petals.
- The corner - the base located at the bottom needs to be folded, and after you unfold the bud, hide it inside.
- Unfold the bud and place the stem in the resulting “pocket”.
Important! To make the leg, take a piece of green paper, fold it diagonally and fold both sides of the square to the center line. Fold the workpiece in half so that you get a long triangle. Make a transverse fold to form a leaf. That's all, your stem can be attached to the bud.
Method number 2. "Diamond":
- Take a square piece of paper and bend it into a triangle.
- Open the triangle so that it returns to its original square appearance. Afterwards, fold it again, only on the other side. You should end up with a cross.
- Turn the piece of paper over so that it looks like a pyramid. Bend it in half. Turn over and unfold. Bend again from left to right. You should have folds in the form of stripes and a star pattern on your piece of paper.
- Make the triangle again, while pressing on the center formed at the bottom. You will get a pyramid.
- Fold the corners of one triangle toward the center, smoothing it with your fingers.
- Turn the triangle with the sharp end towards you. The same procedure should be done with the other two. Fold the corners into the middle.
- Turn the craft over and do the same with the second lower triangle. As a result, you should have a diamond shape.
- Grab a small triangle on top of the diamond and bend it towards the center. Turn the workpiece over and do the same operation.
- Lay out the product in front of you. The left corner must be inserted into the corner on the right. You should end up with a triangle on top of the diamond. Turn the work over and do the same operation again.
- If you did everything correctly, then a miracle will happen. Simply blow into the hole at the bottom of the flower so that the bud opens.
Important! The stem can be made from green paper rolled into a tube or you can use a twig.
Method No. 3. Delicate tulip:
- You need to start it according to the same scheme as the “Diamond”. You should end up with a triangle with the folds tucked inward.
- Fold the open corners of the triangle outward, thus turning them inside out.
- Bend the sharp corners one by one to the middle of the workpiece and wrap it inward. You should have four petals. Secure them with side folds.
- Spread the petals and insert the stem.
Method number 4. Terry tulips:
- Take a square piece of paper. Fold it along both diagonals, while turning the top up so that you end up with a rhombus.
- Fold each corner towards the center. You should end up with a square.
- Bend each corner outward from the center.
- Fold the workpiece so that all the cloves are distributed evenly.
Important! Make sure that the cloves are not distributed along the lines of the original diagonals.
- Roll the workpiece into a cone, bend the base and straighten the petals.
Method No. 5. “Little one”:
- In order to make a tulip out of paper, you need to fold a square sheet so that you get a triangle with folds inside.
- Turn the bottom square that turns out towards you.
- Fold both top corners towards the middle. You should end up with a blank in which each petal is bent outward.
- Unfold the petals and insert the stem.
Method number 6. “Sun in a glass”:
- Take a square piece of paper and fold it in half twice, and then diagonally.
- Next, it should be folded into a small square, with the folds tucked inward.
- In the lower open part of the workpiece, both sides must be folded inward. Do the same with the inner corner.
- Form a rhombus along the fold lines on both sides. You should get it with an elongated top.
- To round the tops, you need to bend the top corner. This must be done on both sides.
- The lower sides need to be bent towards each other and the side folds of the petal should be fixed.
- Spread the petals along the folds, thus forming curves.
We create three-dimensional flowers from corrugated paper
In order to make a tulip flower from corrugated paper, you will need:
- Corrugated paper in two colors;
- Scissors;
- Glue;
- Wire.
Operating procedure:
- First you need to make the petals. You need to cut strips measuring 18x3 centimeters from corrugated paper.
- Fold the strip until its width is 4 centimeters.
- Mark the outline of the future petal and cut it out.
- Give it the correct shape by narrowing at the bottom and widening at the top.
- Fold 8 petals and form a bud. Secure it with glue.
- Cut a strip of green paper and wrap it around the wire.
- Cut out leaves from paper.
- Attach the finished bud and leaves to the stem. If desired, you can form the stamens and insert them into the inside of the bud.
Important! You can use the same scheme to make an original gift bouquet. To do this, when collecting the bud, the petals need to be attached with glue to the candy, which will serve as the stamens. Believe me, such a gift will be appreciated!
If you are new to the origami technique, here are some valuable tips that will come in handy when making flowers:
- Before you begin, you should make sure that the sheet you choose meets the required format.
- Always ensure the accuracy of cuts, angles and inconsistencies. The accuracy of the appearance of the future product directly depends on this.
- While working, do not turn the figure in different directions unless absolutely necessary. This can confuse you, causing you to make mistakes.
- Try to keep the folds as straight and sharp as possible. Smooth them with something heavy during the process.
- Always use a ruler to ensure an even fold.
Video material
If you decide to make a tulip from paper, you should count on the fact that, most likely, you will not succeed the first time. But don't despair. The main thing is patience. And using the above tips will only help you in creating a fabulous bouquet that will fill you with only positive emotions at any time of the year.
Tulips are amazing spring flowers that bring a feeling of celebration and comfort to our homes. True, their splendor is fleeting - they quickly fade. Do you want to admire the beauty of flowers all year round? Make paper tulips that will not only enliven the interior, but will also be an excellent addition to a gift for March 8 or a birthday.
How to make a paper tulip in origami style
First, decide on the color of the tulip - select the necessary colored paper, since it is difficult to paint the finished craft. In addition, you will need scissors.
- Fold the sheet diagonally to form a triangle. Cut off any excess paper and set aside.
- Unfold the triangle and bend it in the other direction, then straighten it - a square with the indicated rays comes out. Fold the paper in half, turn the corners towards the middle line, straighten the sheet - the intended bends clearly appear on it.

- Connect the workpiece along the wrinkled lines so that you get two equilateral triangles. Turn the shape with the base up and fold the wings so that they meet at the corners, do the same on the other side.

- Fold the wing to the right, duplicate it on the left, and insert the tip of one wing into the other. Repeat the procedure from the bottom side and smooth the base with your fingers - you get a pyramid.


- Grab the wings with your index finger and thumb and push the pockets that have formed slightly apart. Turn the workpiece over, you will see a hole in the middle of the bottom, blow into it - and the flower will take shape.


- Twist each petal onto a pencil and the tulip will bloom. Fold a stem from the set aside piece of paper, insert it into the bud - the voluminous tulip is ready.

- Make several multi-colored paper tulips; they can be placed in a vase, attached to a summer hat, or decorated with a photo frame.

How to make a tulip from corrugated paper
Tulips made from compressed paper, collected in bouquets, will perfectly decorate a holiday table or gift wrapping, and filled with sweets, they will become an exceptional gift for any person. For a sweet bouquet you will need: corrugated paper, round candies in candy wrappers, tape, scissors, tape, wire, wire cutters.
- Cut the pink paper into 20 x 2 cm strips. Twist the middle of each piece of paper, then fold it in half. Bite off a 15 cm long wire and secure the candy on it with tape.


- Form a bud by securing the petals to the stem with adhesive tape, overlapping each other in two rows. Wrap the same Velcro around the base of the flower.


- Prepare leaves from green paper and attach them to the stem wire. Collect a bouquet of tulips and you can go congratulate your loved one.


How to make a tulip from colored paper
This is a simple option for making a tulip, so get the kids together to make a craft. Materials needed: colored paper, scissors, glue, pencil, wooden skewers, green tape.
- Prepare a flower template from white cardboard. Place it on a piece of red paper and cut out 4 petals.

- Fold each piece in half and glue it on the sides. Wrap the stick with adhesive tape, dip its sharp end in glue and insert it into the middle of the flower. Glue the second part of the bud on top.


- Cut out two light green leaves and glue them to the stem on both sides. Decorate the product with a ribbon, rhinestones, a bow - and an original gift is made.

As you can see, from ordinary paper you can create colorful, life-like tulips that will never cease to delight you with their blooms and give you a wonderful mood every day.
Tulips are spring flowers loved by many. But, unfortunately, the flowering time of tulips is quickly ending. And cut flowers soon lose their attractiveness.
But paper tulips will remain in their original form for a long time and will delight you and your loved ones at any time of the year. If you want to make an original gift that will never fade, give a tulip made by yourself. Or make a whole bouquet and decorate your room with it. Today we will look at several techniques for making flowers.
Lesson No. 1: voluminous tulips made from paper triangles 
The first lesson is the most difficult to implement. But this only makes it more interesting! To assemble this flower, you will need a large number of triangular parts (95 for each flower). They are done as follows:
1. Cut a sheet of A4 size into 16 equal squares. 
2. Take one of the squares and fold it in half horizontally. 
3. Fold the square again vertically, then unfold it. 

4. Fold both edges of the rectangle along the center line and carefully smooth both folds. 

5. Turn the shape over and cut off the ends protruding from the bottom. 

6. Fold the bottom edge of the shape up and smooth the fold. 
7. Fold the figure in half towards you. 
8. Repeat all these steps on the remaining squares. 
Having made the required number of parts, you can begin assembling the flower:
1. Form rows 1 and 2, connecting the parts through the slots in the end. 
2. Make a circle with 15 pieces in each row. 
3. Add a third row. 
4. Turn the workpiece over and squeeze it into a bud. 

5. Add rows 4 and 5 with 15 pieces each. 

6. Next, build on the structure on one side so that you get a triangle: 
Row 6 – 4 pieces Row 7 – 3 pieces (on top of Row 6) Row 8 – 2 pieces Row 9 – 1 piece
Repeat the addition on the opposite side of the flower, opposite this triangle. 
All that remains is to make the stem. To do this, take a sheet of thick paper and, rolling it into a hard thin tube, wrap it with green floral ribbon. 
Apply a little glue to the end of the stem and insert it into the tulip. 
Cut and glue 1-2 oblong-shaped leaves to the stem. 
The tulip is ready! 
Master class No. 2: tulips made from tissue paper 
In this lesson you will learn how to make very delicate, airy, thin and graceful tulips. At the same time, they will be quite simple to make; all you need is perseverance and a little skill in working with watercolor paints. They can be an excellent gift not only for the mother from the child, but also for the girl she loves.
Materials:
White, yellow and green tissue paper
Watercolor paints
Several pashotnitsa (stands for boiled eggs)
Drinking straw
Glue
Operating procedure:
1. Cut out identical petals with slightly wavy edges from white tissue paper.
2. Stick two petals on top of each other (one layer of tissue paper is too thin and will be difficult to work with).
3. When the glue has dried, place the petals on a flat surface, such as a tray, and paint with watercolors.
4. Without waiting for the petals to completely dry, carefully lift them from the tray and place them in the tillers to give them a curved shape.
5. Place the tillers near a heat source to dry the paper. 
6. Cut a wide strip of yellow tissue paper, fold it in half lengthwise and make a fine fringe along the double edge.
7. Wrap the strip around the edge of the drinking straw and secure with glue - this is the core of your flower.
8. Remove the dried petals from the tillers and glue them to the tube around the core.
9. Cut a strip of green tissue paper and, securing the edge under the flower, wrap the entire tube. Tape the opposite end of the tape. 
Instruction No. 3: tulips made of thick colored paper 
The easiest way to make flowers. It is perfect for small children.
Materials:
Thick colored paper (about 270 g/sq.m.)
Wooden sticks for stems
Green acrylic paint
Hot melt adhesive
Stationery glue
Green felt-tip pen with soft tip
Flower template that can be downloaded here
Sheet of cardboard
Operating procedure:
1. Print or draw on cardstock and cut out the template for the flowers and leaves.
2. Cut out 4 flowers and 1 leaf for each tulip. 
3. Fold the flower blanks in half along the center line (if the paper is one-sided, the colored side should remain inside). Iron the fold and unfold them to their original position. 
4. Glue two pairs of blanks as shown in the photo. 
5. If the edges of the pieces don't quite match, trim off the excess. 
6. Paint the sticks with green paint and let them dry. 
7. Now glue two pairs of flower blanks, placing the edge of the stem stick between them. While the glue dries, the parts can be pressed together with paper clips. 
8. Cut out leaves from green paper and draw center lines using a green marker.
9. Glue the leaves onto the stems. 

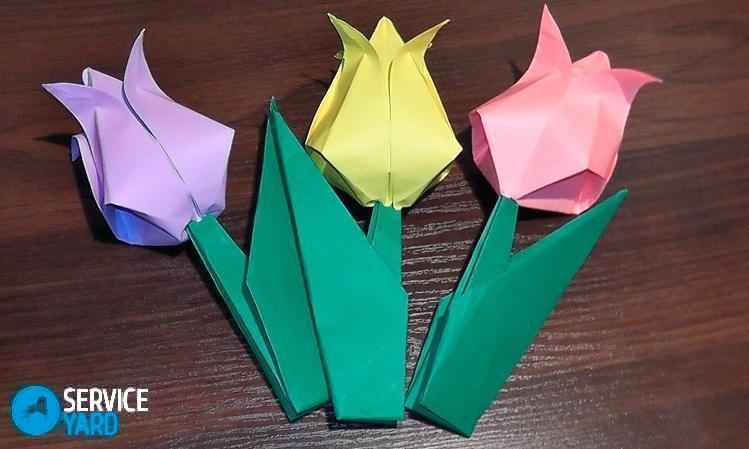
Lesson #4: classic origami tulip with stem 
Not the simplest, but also far from the most difficult option for creating a paper tulip using the origami technique. This lesson can also be brought to life together with your child. For this project you will only need square pieces of paper - green and yellow.
flower head
1. Place the yellow sheet with the colored side up, fold it in half vertically and horizontally, and then return it to its original position.
2. Turn the sheet over and make two diagonal folds, then unfold it again.
3. Fold the square into a triangle so that the two side points meet on the bottom. 
4. Bring the side corners of the top layer of the shape up along the center line. Then turn the shape over and do the same on the other side. 
5. Flip the right side of the diamond to the left, then flip the piece over and do the same on the other side. You will get the same diamond shape, but with a smooth surface. 
6. Bring the edges of the top layer together and nest one inside the other. Smooth the folds along the edges and make sure that sections A and B are equal. 
7. Repeat the same on the other side of the figure.
8. Grasp the resulting cones on both sides, slightly spread them apart and inflate the bud through the hole that has opened at its base.
9. Fold back the edges of the petals at the top of the bud. 
Stem
1. Place the green square on the table, color side down, as shown in the diagram, and make a vertical fold. Then return the square to its original position. 
2. Fold the corners toward the center along the first fold line. 
3. Next, bend the resulting corners again along the same line, and then again. 
4. Turn the figure over and fold it in half lengthwise, raising the bottom corner to the top.
5. Fold the resulting shape in half in width.
6. Bend the top edge of the outside of the shape outward.
7. If you did everything correctly, you will have a stem like this that can be placed on the table: 
Now simply place the tulip head on the vertical rod.


