Colored paper is an excellent material for crafts. You can make appliqués, various figures and many other creative things from it. In this article we will look at how to make crafts from colored paper for elementary school children with your own hands.
You will need: thick colored paper, glue gun, ruler, scissors, tape, rubber band, pencil, pen spring.
Master Class


You will need: colored cardboard, scissors, glue stick, cotton wool, stapler.
Master Class

Rainbow in the clouds is ready!
Binoculars

You will need: yellow cellophane, scissors, tape, black paint, brush, green and black paper, glue, rubber band, wine cork, string or elastic band.
Master Class

The binoculars are ready!
Origami rose

You will need: double-sided colored paper, scissors, a simple pencil.
Master Class

The origami rose is ready!
Moving 3D fish

You will need: colored paper, scissors, glue, pencil, black felt-tip pen.
Master Class


You will need: a sheet of colored paper, a felt-tip pen and scissors.
Master Class
- Fold a sheet of colored paper in half.
- Place your palm on the leaf so that your thumb and index finger touch the edge of the leaf, thereby forming half a heart.
- Circle your palm.
- Cut out the palm and unfold the craft.
A heart in hands made of colored paper is ready!

You will need: white and yellow colored paper, a simple pencil, ruler, glue, coin or compass.
Master Class
- Cut 9 strips of paper the same size.
- Make 2 circles on yellow paper.
- Cut them out.
- Glue the ends of the strips together to form petals.
- Glue the petals to the yellow circle, then glue the second circle on top.

You will need: red colored paper, a pencil, scissors, a round object.
Master Class
- Trace a round object on colored paper.
- Draw a spiral in a circle.
- Cut out the circle.
- Cut the spiral in such a way that you get a “spring”
- Twist the rosette and make the required number of rosettes in the same way.
The original colored paper roses are ready! I recommend watching the video master class!
You will need: double-sided colored paper, glue gun, stick or skewer as a stem, button.
Master Class

A creative flower made from colored paper is ready!

You will need: 4 sheets of colored paper, double-sided tape.
Master Class
- Fold each sheet into an accordion shape.
- Fold each accordion in half to form a fan.
- Glue 4 sheets together to form a circle.
The fan flower made from colored paper is ready!

You will need: colored paper, stapler, cut out butterfly (from a magazine, notebook, picture), felt-tip pen.
Master Class

The case for surprises made of colored paper is ready!

You will need: colored paper of black and yellow, a simple pencil, scissors, ruler, glue, compass, glitter.
Master Class
The colored paper owl is ready!
You can also make a cute bunny out of colored paper, and see how in this video!
Sisters made of colored paper

You will need: paper of two colors, 2 wooden sticks, buttons for eyes, elastic bands or strings for hands, pencil, glue.
Master Class

The paper girls are ready!
Fish made from colored paper

You will need: colored paper, scissors, glue, markers.
Master Class

Paper fish are ready!
Colored paper envelope

You will need: A4 sheet (can be colored), scissors.
Master Class

Bookmark “Nibbler” made of colored paper

You will need: cardboard template, scissors, glue, decorative elements - felt-tip pens, paints, buttons, beads, glitter...
Master Class

Quick navigation through the article
Making paper crafts with your own hands is a simple, inexpensive and very interesting activity for both children and parents. All you need is paper, scissors, glue and a few fun ideas. In this material you will find 7 step-by-step master classes on needlework from different types of paper and 50 photo ideas for your inspiration.
Idea 1. Volumetric crafts
We offer the smallest craftsmen to make a simple three-dimensional paper craft in the form of a cat like this.

Materials:
- A4 sheet of paper;
- Scissors;
- Glue.
Instructions:
- Download and print the template (see cat template below) on white or colored paper;
- Cut out the template with scissors, and then make 4 cuts in it along the marked solid lines;
- Bend your neck like an accordion along the markings and twist your tail;
- Fold the dotted fold lines on the legs and glue them to the cardboard.
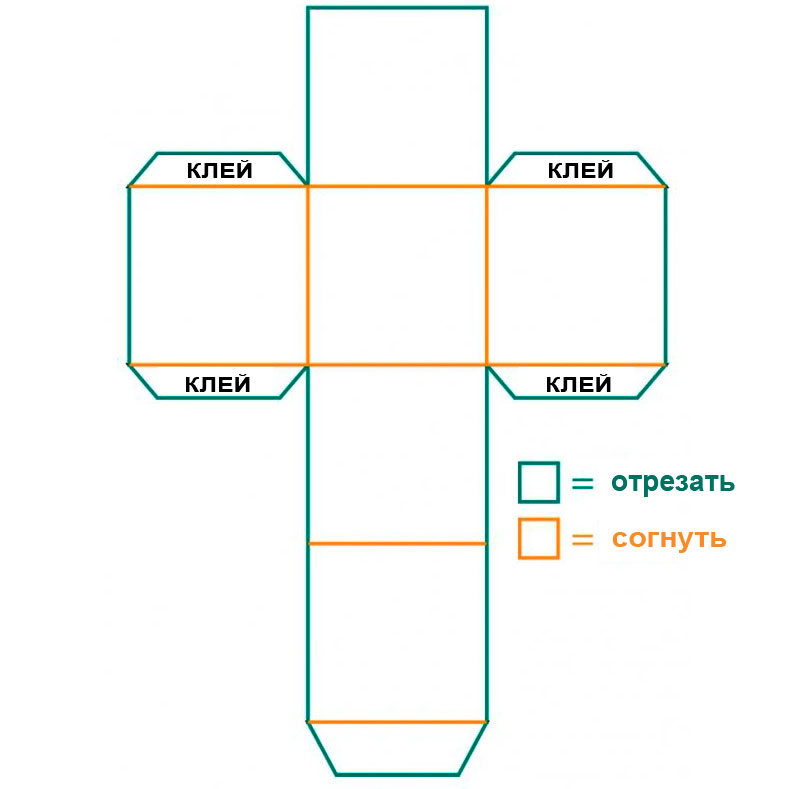
For older children there is a more difficult task, namely a master class on making a three-dimensional paper craft in the shape of a bird.

Instructions:
Step 1: Download and print the layout diagram (see below). Please note that the file contains a colorless template so you can print it on colored paper.
Step 2. Cut out all the parts exactly along solid lines using a breadboard knife.
Step 3. Fold all the fold lines according to the principle: thick dotted line = fold inward, thin dotted line = fold outward.
Step 4. Glue the parts together, applying glue to their corners (labeled Glue). Follow this order:
- First glue the beak to one side of the bird, then to the second.

- Glue the back of the bird starting from the beak, as shown in the photo.

- Glue the wings.

- Now take the part that is the bird’s breast, and at one end fold it and fix it with glue into a triangle as shown in the photo.


- Assemble the legs, make sure the knees are at 90 degrees, then glue the legs to them.

- Well, that's all, all that remains is to glue the legs to the body and your three-dimensional paper craft is ready. If you wish, you can make a whole flock of these birds in different colors with your own hands.


Idea 2. Wall panels, paintings and applications
It is known that you can draw not only with paints on paper, but also... with paper on paper. Such activities are no less exciting and useful for the development of hand-eye coordination, fine motor skills, perseverance, the ability to plan your work, combine colors, shapes and materials.
The following selection of photos presents ideas for paintings, panels and paper applications for children of different levels of complexity.


By the way, the applique can be made from parts of the same shape, but of different sizes and colors. These can be circles or hearts. The following slider presents examples of such paper crafts and schemes for their manufacture.


Here are some more examples of interesting crafts made from different types of paper.

Now we invite you to get acquainted with a master class on making an original, but very easy paper craft. We have no doubt that such cute figures will help instill in your child an interest in reading books.


Materials:
- 1 sheet of A4 colored paper;
- 1 sheet of white A4 paper;
- Scissors;
- Glue stick;
- Markers, pencils and paints.
Instructions:
Step 1. Fold one half of a white A4 sheet in half and let the child independently draw the cover of his favorite book on it, also signing the title and name of the author.
Step 2. Cut three long strips of colored sheet about 2.5 cm wide. You will have 4 pieces: 2 strips for the legs, 1 strip for the two arms and one rectangle to create the body of the figure.

Step 3. Take two strips (for the legs), fold them like an accordion, and then glue them to the rectangular body.
Step 4. Divide the remaining long strip into two equal parts, draw fingers at the ends and glue to the body.
Step 5. Bend the top of the figure to the front side and give it bangs using scissors as shown in the photo.

Step 6. Cut out circles from the remaining half of the white sheet and glue them onto the figure as if they were glasses.
Step 7. Draw details: eyes, mouth, nose and glasses with a black marker.
Step 8. Now glue the book to the hands of the figurine and finally place it on the table or hang it on the wall, for example, near a bookshelf.

Idea 3. Hats
All children love games with transformations and use everything they can get their hands on to do this. To provide your child with props, you can make fantasy headdresses with him. By the way, such crafts from colored paper can be made for one or more children for a performance, masquerade, themed birthday party or any costume party. In the following selection of photos you can see examples of a wide variety of paper “hats” - from pirate cocked hats to wigs.


Today we invite you and your baby to make a hat in the shape of a dinosaur head. This master class is so simple that a child aged 3 years and older will need very little help from you.

Materials:
- 3 sheets of colored paper;
- Glue stick or PVA;
- Scotch;
- Scissors.
Instructions:
Step 1. Cut 4 strips about 3cm wide along the long side of the paper. Two of these strips will turn into the headband, and the other two will become the crossbars of the “hat”, onto which the dinosaur spikes will be glued.

Step 2: Take the other two sheets of paper and cut them into strips about 5cm wide along the short side of the paper. You can measure and cut the strips by eye, but in the end you should end up with 5 strips from each sheet. We need these blanks to make spikes.

Step 3. Fold each blank for the tenons in half and, stepping back from the fold about 1.5 cm, draw a marking in the form of a triangle with a height up to the very edge (see photo). Next, simply cut out the future thorns.

Step 4. Glue two crossbar strips, and then glue the spikes on them in a row as shown in the photo below.

Step 5: While the glue is drying, size the two pieces of the headband to match the circumference of your baby's head, then tape them together into a circle.
Step 6. Now let's get back to the spikes. Turn the crossbar over so that the tenons are on the table and bend each of them well (see photo). Form the first spike: cover one side with glue and connect it to the other. Use paper clips to hold the tenon in place until the glue dries. Repeat these steps with the remaining spikes.

Step 7: Once the glue has dried, remove the staples from the spikes and simply glue the crossbar to the headband at the front and back.

Idea 4. Toy figures made from toilet paper rolls
Toilet paper rolls make great craft supplies for kids that just need a little embellishment. For example, you can make such wonderful toys from them.


Children, as they say, are the flowers of life. And this saying is reliable and correct, since with the birth of a child, every person literally changes for the better. Becomes softer, kinder and more responsible. All families with at least one child try to surround him with care from both sides, parental love and warmth. But the time comes when the little ones grow up and they need to develop further socially by attending kindergarten. So that children do not feel a lack of attention, teachers, in addition to drawing, modeling, singing, dancing, physical education, games, are engaged in making crafts from a variety of available materials, either plastic bottles, paper, or cardboard, dried tree leaves, pine cones, etc. . If you, as a teacher, are interested in this creative activity that is useful for children, then we advise you to visit our article. In it we will provide 11 photos of ideas for easy DIY crafts for kindergarten, made quickly, simply and beautifully. Prepared videos with step-by-step master classes, which contain an accessible description of all the works we offer, will teach educators the basics of children's applied art. They, in turn, will teach the kids to cope with the task on their own or with a little adult help. In one case or another, handicrafts will bring a lot of positivity and skills to the younger generation, allowing them to understand the world around them as deeply as possible.
Paper bookmark
The most popular paper craft in kindergarten is a bookmark. It is easy to do even with small children 4, 5, 6 years old. Fancy animal faces made with your own hands will look very organic. Below you can watch a master class with step-by-step instructions.
You will need:
- colored paper, A4 size,
- scissors,
- pencil,
- glue.
Progress:
- To create a beautiful, bright craft in kindergarten, you first need to draw a square on a piece of paper, measuring 20 X 20 cm. Divide this square into 4 equal parts with a pencil. You should get 4 squares, measuring 5 X 5 cm.
- Divide the upper right and lower left squares with lines to form triangles. You need to draw a line from the upper left corner to the lower right. The lines must be parallel. The outer triangles must be crossed out; they will not be needed.
- We cut out a shape from paper with our own hands without taking into account the crossed out areas. Cut off the top triangle. If you lay the paper flat, it looks like a rhombus with two triangles glued on.
- Fold each triangle in half and place it one at a time on the base of the diamond. The resulting pocket is a bookmark. He puts it on the corner of the page, thereby fixing it.
- You can cut out any applique onto a pocket of colored paper and glue it. We made such an interesting DIY craft for kindergarten. Take advantage of the idea we proposed, and let the photo serve as a clear example for you.
Video: bookmark for books “Panda” using origami technique
Christmas ball made from pasta
An excellent option for children in kindergarten would be a pasta craft. There are many variations of such pasta works, because they are available and everyone has them in their home. This is how you can make your own Christmas tree decoration - a Christmas ball. In the description below you can find detailed instructions on how to make it. 
You will need:
- balloon,
- glue,
- pasta,
- dye.
Progress:
- Inflate the balloon to the desired size and tie.
- Then we apply glue to each pasta, gluing them together.
- After you have made a small piece of pasta with your own hands, apply the piece to the ball (for convenience, you can fix it with PVA glue by gluing it to the ball). Thus, we cover the entire ball with pasta, leaving a gap of one piece near the knot. Now we wait for everything to dry, with Moment glue the drying process will be faster, but if the craft is done together with a child, it is better to use PVA.
- When everything is dry, we pierce the ball with a needle and pull it out through the hole, and then add the remaining pasta.
- You can attach a rope or ribbon so that your Christmas tree decoration can be attached to the tree. Such a ball can be painted with paints, or it can be left in its original form. Such a beautiful craft can be easily done with a child of 5, 6, 7 years old, both at home and in kindergarten, with the help of adult help. Remember our idea and the accompanying photo, it will certainly be useful to you.
Video: DIY pasta Christmas balls
Cow made of plasticine
For children in the younger group, you can suggest creating a ladybug from plasticine with your own hands. Crafts made from this available material can develop not only hand motor skills, but also the child’s imagination both at home and in kindergarten. A cool creation designed for children 7, 8, 9, 10 years old, which can be made very simply by yourself. In order to do this creative work correctly, watch our master class with step-by-step instructions and a photo idea. 
You will need:
- plasticine (red, black and white),
- plastic cover, diameter 10 - 12 cm,
- pen,
- white sheet of paper.
Progress:
- In order to get a colorful and cheerful children's craft made with our own hands, we will need to mold a round body from red plasticine, and a black spot on it from black plasticine. Black plasticine is also used to form the legs and head.
- You need to take a transparent plastic lid and draw a flower resembling a daisy on it with a pen.
- Place a white sheet under the bottom of the lid so that the outline of the design is visible. Then, along the contour of the image, cover the flower with different colors of plasticine. In this simple design, you can create other types of crafts for such holidays as March 8, Easter, New Year 2018, etc. Use them to decorate exhibitions in kindergarten or simply become an original gift for friends and family.
Video: making a ladybug from plasticine with your own hands
Bee
The material for children's crafts, in relation to our photo idea, can also be an ordinary plastic bottle with a volume of 0.5 liters. Such a good craft for children in kindergarten or at home will delight everyone, because doing it yourself will seem exciting and not at all difficult. In order to figure out how to do it, let's look at the step-by-step instructions with a detailed and understandable description. 
You will need:
- plastic bottle 0.5 l and 1.5 l;
- colored paper;
- paints;
- scissors.
Progress:
- A 0.5 liter bottle must be painted with paints or yellow colored paper pasted onto it.
- In a similar way, make bold black lines on the bottle with your own hands.
- Cut out the eyes, mouth and antennae of the future bee onto the paper lid.
- We cut out the wings from a 1.5 liter bottle and glue them with glue. The result is a cute little yellow bee made from ordinary waste material. A good DIY craft for children in kindergarten. It will perfectly decorate any group, children's playground, annual thematic exhibitions, etc.
Video: making a bee from a plastic bottle
Vase
Another way to use unwanted plastic bottles in crafts is to make your own vase. Such a bottle can be transformed into a decorative vase with the cute faces of cats or other animals. The best photo idea for kindergarten children is presented in our article with a full description and step-by-step instructions. Help the kids create something similar and creative, give them the opportunity to be proud of themselves and their achievements. 
You will need:
- Plastic bottle,
- Paints,
- Sponge (for painting),
- Marker,
- Scissors.
Progress:
- To create a craft with your own hands, you need to cut the bottle in half and take only the lower part for creativity.
- We cut it so that the edges are even and leave two triangles to make ears.
- Using white paint using a sponge, we completely paint over our workpiece.
- We draw triangles on the ears and nose with a pink brush.
- Using a marker, draw the cat's face.
- Our craft in the form of a vase or pot for fresh flowers is ready. If desired, it can be placed in a kindergarten group, somewhere outside in the yard, or given to mom on March 8th as an unprecedented originality. Such value will be very dear and pleasant to her!
Video: master class on creating a vase from a plastic bottle with your own hands
Craft "Cipollino"
You can use fruits and vegetables for handicrafts in kindergarten. You can make a “Cipollino” craft with your own hands from already sprouted onions. This creation can be easily made with a child of 3, 4, 5 years old. To correctly and without problems implement the idea we provided, see the detailed description below with a visual photo. 
We will need:
- Small head of onion,
- Jar (the diameter of the jar opening should be smaller than the onion),
- colored paper,
- Scissors,
- Glue,
- Felt pens,
- Plasticine.
Progress:
- On the bulb itself, you need to draw eyebrows, a mouth and cheeks with a felt-tip pen, and make the eyes and nose with your own hands from plasticine.
- Cover the jar with paper and draw the body of a cartoon character on it.
- Insert the “head” of the craft into the jar. It turns out to be a very nice and believable Cipollino. For a kindergarten, this is a real find that will appeal to all children and teachers. Even if your baby develops at home, you can diversify his leisure time with this creative work.
Octopus
Woolen threads can also be used as a material for children's crafts. You can use them to make a cheerful octopus with your own hands, which your child will really like. This work is very easy to do and it will not take you much time. You can watch a master class with a detailed description of our proposed idea with a photo to create such a creation yourself. 
We will need:
- Wool threads (60 threads, 35 cm long) and a little more for tying,
- Ribbon,
- Small plastic ball (for the head),
- Colored paper (for the eyes), or you can use ready-made ones from the store,
- Scissors.
Progress:
- To make crafts in kindergarten or at home, take the cut threads and put them together, tie them in the middle with a thread and place a ball under it. Wrap the threads around it and tie it under the ball. This will serve as the head of the future octopus.
- Using the remaining threads, weave your own braids in the shape of its tentacles.
- Draw the eyes on paper, cut and glue, or use store-bought ones.
- Tie ribbons to your head, which will serve as decoration for the craft. Our octopus is ready from available materials.
Video: master class on making an octopus from threads with your own hands
Butterfly
One of the simple crafts in kindergarten or at home is a butterfly made from paper napkins; even a child of 3, 4, 5 years old can cope with such work. This article presents a step-by-step master class on this idea with photos so that you can easily cope with it. Such a handmade butterfly will delight anyone, and most importantly, it can be conveniently mounted anywhere - in a group on curtains, flowers, or even at home as a creative, unusual decoration. 
You will need:
- Napkins,
- Pin,
- colored paper,
- Felt pen,
- Scissors.
Progress:
- You need to take napkins of two colors of different sizes and fold them on top of each other, with the smaller napkin on top. Gather in the middle.
- We place the napkins in a clothespin with our own hands, which will serve as the body.
- On a clothespin we draw a face for our beauty, and from colored paper we make antennae and attach them to the clothespin. Our craft in the form of a beautiful butterfly is ready. This would be a great idea for a kindergarten.
Video: master class on creating a butterfly from a napkin with your own hands
Bug
You can make various bugs with your own hands from ordinary small flat stones with your children in kindergarten. To do this, it is advisable to be able to draw. This bug will appeal to everyone without exception, both adults and children. And if you create them in large quantities, they will look great on a shelf or in a pot with fresh flowers. To complete this craft, below you can see the full description with step-by-step instructions. 
You will need:
- A pebble shaped like a beetle
- Paints,
- Glue,
- colored paper,
- Scissors.
Progress:
- In order to create a beautiful craft for kindergarten with your own hands quickly and easily, you need to cut out the base for the antennae and paws and glue them under the bottom of the stone.
- Paint the stone itself with paints in the shape of a bug. That, in general, is the whole complexity of this creative work.
Hedgehog
You can make a hedgehog from an ordinary pine cone. This DIY New Year's craft, will decorate the Christmas tree in kindergarten and bring pleasure from the process of independent work to all children. Below you can see detailed instructions on how to make such a cute hedgehog. 
You will need:
- Cone,
- Plasticine.
Progress:
- We glue a muzzle onto the sharp part of the plasticine cone, and on the muzzle we also make eyes and the tip of the nose with our own hands.
- Now we make the paws, also from plasticine. This way we will get a very cute and prickly hedgehog.
- Additionally, you can make a clearing by forming leaves from plasticine and molding a mushroom. Such a wonderful craft will be a great idea for children to gain skills in applied arts.
Video: master class on making a hedgehog from pine cones with your own hands
Mushroom “Amanita” from plastic kinder eggs

To make the children’s stay in kindergarten more interesting and memorable, it is, of course, necessary to include labor lessons, so to speak, in general classes. In addition to drawing, children will have fun making something with their own hands from cardboard, paper, plasticine, plastic, fabric, etc. Discarded materials can also become handy materials. Various boxes, bottles, magazines and much more that parents can easily bring for children's games. Today we would like to invite you, dear teachers, to organize an unusual activity with children that will teach them how to create small “Amanita mushrooms” with their own hands, as in the photo idea, from a simple plastic kinder egg. They are, of course, found in large numbers in every home where there are children. So, let's start creating crafts, referring to our provided master class with a step-by-step description of the course of action.
To work you will need:
- plastic kinder egg;
- cardboard or plastic cover for the stand;
- red cardboard for the mushroom cap;
- sequins for dots;
- stationery glue “Moment”;
- satin or other ribbon;
- scissors;
- ready-made ladybug for decoration.
Process of creation:
- We would like to immediately warn adults that despite the simplicity of the work, your help and close attention will still be required. Because the work will involve the glue itself and scissors, and this is not so safe for the guys. We take our plastic base in the form of a kinder egg and glue a satin ribbon to its bottom, folded in such a way that it resembles green grass in appearance.
- Flowers can be made from colored cardboard or use ready-made plastic blanks. We attach them to the grass using office glue, as in the photo.
- Then we will need to create a mushroom cap. Red cardboard will help us with this. We fold it in the proper way and glue the edges. Instead of black dots, we attach sequins for a more expressive look, and on top of the fly agaric we plant a store-bought ladybug.
- We make a fly agaric “skirt” from a piece of chiffon fabric and attach it to the edges of the red hat.
- We install the finished craft on a plastic lid or cardboard using office glue. So our product is ready, which will serve as an excellent decoration for a group in kindergarten. With your own hands you can create other types of originality that will expand the imagination of kids.
Finally
Our article has come to its end, providing you with many original photos of DIY craft ideas for kindergarten. We hope that you still liked some of them and you will certainly include them in your child development program, even at home. Moreover, the materials at hand can be so diverse and accessible that your imagination will immediately run wild, giving birth to completely new creations. Pass on your skills to the children in an accessible way, teach them to love and respect art from an early age. This will allow the younger generation to be a little kinder to each other, more attentive to the world around us and its inhabitants, and will teach us to love and appreciate everything that is so beautiful and fragile around us.
On the theme "Spring" for kindergarten. We searched the entire Internet and found 20 unconventional, but at the same time simple spring crafts that children can make with their own hands.
It’s not just kindergarten that needs ideas for spring-themed crafts. Children who do not go to kindergarten also love to craft, and they will probably be interested in making something new and unusual with their own hands, for example, a spring cloud, a voluminous paper rainbow, or
Many of these crafts can be a wonderful gift for your mother or grandmother on March 8, 2019 or Mother's Day. After all, there is nothing more enjoyable than a craft that a child makes with his own hands with the thought of how happy his mother or grandmother will be. Needless to say, some of us even wear them on the street to show off what a wonderful gift the child gave.
20 ideas for crafts on the theme "Spring" for kindergarten
Hurray, the snow is over. And we have three months of rain, thunderstorms, colorful rainbows and magnificent flowers ahead of us. This is what we will display in crafts on the theme “Spring”, which children will make with their own hands in kindergarten.
First, we suggest you make a cloud with rainbow rain. The execution and details depend on your imagination and the age characteristics of the children. For example, ask younger children to make a cloud with rain from ribbons (thinner or thicker), but in the older group you can try making voluminous drops from colored paper.
.jpg)

Here are a few ideas with a voluminous rainbow made of multi-colored paper for a craft on the theme “Spring”. Instructions on how to make them are in the photo.


A simple craft for children, even children from the younger group can do it with their own hands, provided that the teachers prepare the preparations in advance.
.jpg)
You can make such a bouquet of paper hyacinths with your own hands as a gift to your mother on March 8 or Mother's Day.

Spring craft for the junior and middle groups of kindergarten - flowers made from ribbons, paper and ice cream sticks. Instead of textile ribbons, you can use paper serpentine that was left over after the New Year.


Everything is simple here: cut out hearts from colored paper (three for a flower, one for a leaf), pierce a hole in the middle of each of them and string them onto a drinking straw. Voila, and the “Spring” themed craft is ready. All that remains is to bring more straws to the kindergarten.


For this craft, you first need to draw and cut out flowers from paper. Then we fold a fan out of green paper and glue the prepared flowers onto it.

And perhaps even kids from the nursery group can handle such flowers made from wooden sticks. They just need a little help with the glue.

We will cover the topic of paper flowers with origami. Follow the link to find a diagram of origami tulips.

When the children are tired of creating, get dirty from head to toe with glue and cut with scissors even what was not allowed to be cut, invite them to draw spring flowers. Here are some examples of simple drawings, but dandelions and hyacinths need to be drawn with your fingers. If you wish, you can turn these drawings into appliques by cutting out some elements for them from colored paper.


And finally - a spring tree with birds that have returned from warmer climes. The tree trunk is a cardboard tube from toilet paper or paper towels. We cut out the crown, leaves and birds from colored cardboard, and “sculpt” nests and flowers from corrugated paper, crumpling it.

Now you have a ton of ideas for crafts on the theme "Spring" in kindergarten that any child can handle. Good luck and inspiration!


