Useful tips
If you want to decorate your home with beautiful flowers of your own making, or want to give them to your loved ones, then this master class is for you.
You can make it out of paper a huge number of different colors, which, unlike living ones, will never wither.
To date These flowers decorate banquet halls and festive tables.
You can create flowers with your own hands both adults and children.
Paper flower (master class). Paper roses.

You will need:
Thick paper
Pencil (marker)
Scissors
1. Prepare thick paper and draw a spiral on it with a pencil.

2. Cut out the spiral. You can use both regular and curly scissors.

3. Try turning the ends of the spiral outward; if the paper tears a little, this is even good, since the rose will turn out more realistic.

4. Twist the spiral to make a rose.

5. Slowly twist the spiral to the end, slowly loosening the tension.
6. After you have twisted the spiral, secure it with glue. Next, bend the circle that you got in the center when cutting out the spiral - it will serve as the base of the rose.

7. Apply a drop of glue to the base and glue the rose to it.


If you used regular scissors, your flowers should look like this:

Paper flower crafts. Bouquet.

You will need:
Multi-colored soft paper
Scissors and nippers
Thin wire
1. Prepare a wire for the stem and apply a little glue to it.
2. One end of the wire should be wrapped with a thin strip of yellow paper.

3. Prepare paper of the color you want to use for the buds. This example uses pink paper. Fold the paper 12 times and, using scissors, cut out petals for future flowers.

4. Make a bud from the cut out petals.
5. Apply glue to two petals and attach them to the stem (to the place where you wrapped the yellow stripe).

6. Once you have arranged all the petals into a bud, use green paper to wrap the stem of the flower.

7. To make the composition look complete, make 5 buds.
8. When you have finished making all the flowers, you can put them in a vase.
Paper flowers (master class). Blooming branch.

Anyone who is in a spring mood will love this simple and very beautiful craft.
You will need:
Soft paper (red and pink in this example)
Dry branches
Scissors
Glue (glue gun)
1.

1. Fold sheets of soft paper several times until you get squares with a side of 7-8cm.

2. Cut out flowers with five petals from folded paper. It is not necessary to have even petals; rather, on the contrary, this way they will look even more realistic.

3. Carefully glue the two flowers together using a small drop of glue. This must be done so that all the petals are visible.

4. Glue your flowers to a dry branch and you will have a beautiful spring craft.


You can also use plain paper, which you need to divide into several squares and then fold the squares so that you get origami flowers.
This is what it looks like:

How to make flowers out of paper. Toy flower.

You will need:
Thick colored paper
Scissors
Wire
1. Cut out 6 circles of different colors from thick paper. Each circle has a diameter of approximately 7-8cm, but you can choose the size yourself.
* It is not necessary to make even circles.

2. Prepare the wire and bend one end of it so that you get a circle with a diameter of about 10cm (see picture).

3. Fold 5 circles in half and make a small cut in the middle of the fold.

4. One free circle that you have left needs to be attached to the circle on the wire. Use tape for this. This will be the middle of your flower.
5. All that remains is to attach the petals in the middle of the flower using the cuts made earlier.

6. To make the wire stand, bend its other end to form a base (see picture).
The petals can be easily removed and reattached without the use of glue. This makes your craft not only beautiful, but also useful, since it can be used as a toy for children who can learn colors, for example.
Paper flower craft. Making giant flowers.

With such giant flowers you can beautifully decorate your apartment for some holiday, and making them is not at all difficult.
You will need:
Thick colored paper
Pencil
Scissors
Glue gun or glue
1. Prepare a thick sheet of paper and draw a petal on it.
* To make one flower you need to prepare 6 petals.

2. Cut out the petal.
3. Now you need to twist your petal a little so that it gets the desired shape.

4. On each petal you need to make a cut from the bottom.

5. Now bring the ends of all six petals together and glue them together.
* First you need to glue 3 petals for one half of the flower, then 3 more petals for the second half, and then connect both halves.


6. Prepare green paper for the leaves. Draw and cut out the leaves, then fold them in half.

7. Glue your leaves under the finished flower.
8. You need to glue a circle of suitable diameter into the center of the flower.

Paper flowers (diagrams). Napkin carnations.

You will need:
Napkins (white and pink)
Wire
Scissors
Markers
Tin lid from a jar
Below you can look at the instructions in pictures on how to make such a delicate flower.


Flowers made of colored paper. Bright circles.

You will need:
Hole punch for large circles (or scissors and pencil)
1. First you need to make several circles. This can be done using a special hole punch or manually by drawing circles and cutting them out with scissors.

2. Fold all your circles in half.

3. Mark the middle on one circle and begin gluing the blanks neatly folded in half to it. In this case, one folded circle must be placed inside another (see picture).

You should end up with a sun like this.

*If you want a fuller flower, use more circles.
You can also make a blooming flower. To do this, you need to put several blanks into a folded green circle (see picture).

If you fold the green circle in four, you can make a flower like this, in which the diameter of the petals can be different.

Volumetric flowers made of paper and beads

In this master class you will be able to combine a three-dimensional flower and a beaded pattern.
You will need:
Colored thick paper
Pencil
Scissors
Thread and needle
1. Draw and cut out flowers on thick paper.
*If you want, you can make the flower petals convex using an embossing tool (you can replace this with another round object). Just run this tool a couple of times in the middle of the petal and get a small indentation.

2. Fold your blanks and sew beads in the center of the flower.


3. You can also use beads to decorate the card to which you attach the flower. Use a needle and thread for this as shown in the image.


DIY paper flowers. Flowers from a toilet paper roll (option 1).

These flowers are very easy to make, since everything you need to make them is available in almost any home.
For 3 flowers you will need:
4 rolls of toilet paper
1 egg carton
Pencil
PVA glue
Ruler
Stationery knife
Scissors
Acrylic paint
Brush
1.1 Paint all the cardboard cylinders left over from the toilet paper green and leave to dry.

1.2 Divide one of the cylinders into 3 equal parts.

1.3 Use a utility knife to make cuts along the lines.

1.4 Draw a line 1cm from the edge of the cylinder. Draw leaves around the cardboard "ring". Do this with all the parts.

1.5 Cut out the leaves as shown in the picture and you will have 3 small green “crowns”.

1.6 Bend all the leaves to the outside of the crown and cut it (see picture).

1.7 Prepare a carton for eggs. You will need to cut out 6 "cups" (2 for each flower). Do not cut through the middle of the package. You will need the square pieces that are in the middle of the package, between each egg cup. Take a look at the picture - you need to save 3 pieces of packaging for one flower.

1.8 For each flower you need to have 2 “cups” and 1 square, and one cup should be slightly smaller than the other.

1.9 Make cuts on two cups to get petals. Around the large cup, make cuts with scissors to the very bottom, and around the small cup, about 1 cm (see picture).

1.10 Open the petals and color them to your liking, both inside and outside.

1.11 You also need to color your squares.

1.12 Prepare 3 more green toilet paper cylinders. Draw 2 lines across each one, which should be 1 cm from the edges of the cylinder. Also draw lines that go along the cylinder (see picture).

1.13 Use a utility knife to make cuts along the lines that run along the cylinder. Do this on all three cylinders.

1.14 Carefully bend all the strips out of each cylinder to create a vase shape. This will be the stem of your flower.

1.15 It's time to collect flowers. For one flower you need: 1 large and 1 small cup with petals, 1 square, 1 green crown and 1 green stem.

1.16 Use glue to attach a green crown to the top of each stem. Also glue the square inside the small cup, which, in turn, needs to be glued to the large cup.
1.17 Glue the flower to the stem and you're done, you have a flower!
Paper flowers can be used for interior decoration, decor, and even as a gift! Let's try to learn how to make voluminous paper flowers with our own hands, look at examples and photos of beautiful finished works, and also watch a master class for beginners.
Simple products
The easiest way to make flowers is from colored paper - it can be corrugated or ordinary, and if you plan to make strictly decorative flowers, you can take paper with a mother-of-pearl or metallic effect. You shouldn’t make a tulip or a rose as your first experiment - try something very, very simple first.Decorative crafts

In order to make simple and spectacular flowers you will need:
- double-sided colored paper (corrugated paper is also suitable);
- thin wire;
- sharp scissors and a pencil for marking.
For beginners, the easiest way to do this is to fold colored paper several times so that you get a stack of squares approximately 6*6. Then mark the shape of the future buds on the top square with a pencil - it can be a smooth rounded figure, regular circles, or whatever your imagination suggests.
Then, with scissors, you need to carefully trim the stack according to the shape of the marked sepal and disassemble it into components - for each flower you will need three to five blanks. The wire needs to be cut into pieces of approximately 15-25 centimeters, twisted on one side so that a decorative center is formed, then the previously obtained “petals” are put on each wire, after which a stand is made at the bottom of the wire (a stable ring is twisted).
With such crafts you can decorate a table for a holiday, or use them for a photo shoot or interior decor, or you can simply attach them to the wall in the nursery or in the hall near the mirror - a good mood is guaranteed.
Or this simple option:


From what is at hand
Old magazines or newspapers are used to make these products. This way you can make large flowers out of paper - the technique is simple, and paper crafts turn out to be quite impressive.
What you will need:
- unnecessary magazines (absolutely any);
- green adhesive tape;
- sharp scissors;
- large barbecue skewers;
- paper glue or regular hot melt glue.
 By the way, these recommendations can also be used for beginners - they are done quite easily. If you want to make such flowers with children, then make sure that they have safety scissors, or cut the fringe yourself.

Decorative flower garlands
Want to make chic garlands? Use giant paper flowers for them. By the way, making paper flowers for garlands with your own hands is very simple - you only need beautiful, spectacular paper and a little skill. No flower templates for cutting out or diagrams are required; the main task of such large products is to look bright, unusual and attractive; large paper flowers do not have to be realistic.
What you will need:
- scissors;
- corrugated paper of two or three colors (it is better to take bright and light);
- thread or fishing line;
- stapler or glue.
You can choose the size of the rectangles yourself; you just need to remember that the flowers will be the same diameter as the rectangle on the narrow side.
Each pile is assembled into an accordion (look at the photo on how to make flowers from such accordions, if it is not too clear from the description).

Each accordion of five sheets of paper must be fastened in the center with a stapler or glued with a paper ring. It is best to round the edges of the accordion - cut out something like a petal.
Now each blank needs to be turned into a bud - straighten the buds from the accordions you made. The accordions need to be straightened in different directions, and you will see how you can create beautiful paper flowers in just a few seconds.
Then cut the required length of fishing line or thread, and string the buds - your garland is ready.


Another garland option:

Bouquets for decoration
Do you want to make a bouquet of flowers from paper? See photo:Do you want to learn how to make a tulip? Watch the video and step-by-step photos below on how to make tulips in different ways.
Useful information and several step-by-step master classes
At the very end of the article, download patterns and color templates for cutting. By the way, if you want to make origami out of paper, it is best to use special double-sided paper.Watch a detailed master class on how to make flowers and plants out of paper using the origami technique - it’s not only interesting, but also quite difficult, so don’t expect perfectly made flowers right away, you’ll have to try a little to make paper flowers with your own hands.
Also, flower stencils will be useful to you if you make large paper flowers of complex shapes - the same tulip or rose is more convenient to assemble from a special shape of petals.

Try to make large paper ones - just collect a huge rosebud according to this master class (see photo below on how to make flowers lush and beautiful).
Here are templates of large flowers for cutting out of paper:

And here are the step-by-step photos:
How to make flowers for children? Try to minimize any risks - for example, do not let children work with adult scissors, prepare the wire in advance and make sure that children are disciplined.
Learn how to make paper flowers with your own hands using coffee filters or napkins - a thin and fragile napkin looks almost like a real petal, you just need to give it a shape and collect the bud.
This video shows how to make a paper flower for beginners.
A few inspiring photos - see how beautifully you can decorate your holiday with camellias or roses.

Try making voluminous paper flowers with your own hands using cardboard or thick paper - even a child can handle this technique.

Another option for a simple flower:

Leaf templates:


Learn how to make flowers out of paper, a master class on the technique of soaking paper - such products look almost like the real thing!
Now you know several ways to make spectacular and expressive flowers from colored or even regular glossy paper, which means you can easily put together a chic bouquet, make accessories for a photo shoot, or even just decorate a room for a party.


Use the diagrams to make a tulip or other flowers - you need to print them out, cut them out, and then trace them like a pattern.
Templates of leaves and petals for different flowers:


If you want to show your imagination, then try tinting the finished products with a thin brush using the watercolor technique - with veins, the flowers will look even more elegant and interesting.
I continue the theme of designer paper flower crafts that I started in. Paper flower is a modern theme of today. You are offered a sample design solution, after looking at it, you can change it and make something of your own - give free rein to your creativity!
You don't need any special skills to make the flower models you're about to see. Each of you can easily work with a knife, scissors and a glue gun. All you have to do is learn how to quickly fold the paper, then roll it, bend it and glue it.
As a result, a beautiful flower created with your own hands will be your reward.
How to make a flower<<Хризантема>> from paper step by step
We create simple and different shades of chrysanthemums from paper - they will be voluminous and beautiful.

Required tools and materials:
- Pencil, ruler, craft knife
- Quilling stick
- Hot glue gun and glue stick
- Colored paper (thin and thick)
- Green leaf paper
- White glue
- Floral wire wrapped in ribbon
- Green floral ribbon
Master class with detailed instructions
- For a flower with a diameter of approximately 10.2 cm, you will need a sheet of pale green paper measuring 8.9 x 12.7 cm. You can use any other size paper according to the size of the flower.
- On the back of a sheet of paper, using a pencil and ruler, draw lines 6 mm from each short side.


3. Using a ruler as a guide, use a knife to make narrow slits between the two pencil lines.
Tip: Press the ruler firmly against the work surface, being careful not to let it slip. It will take time and patience to get the cuts straight and neat.
4. The narrower the stripes resulting from the cuts, the more graceful and airy the flower will be. And the wider the stripes, the rougher and heavier it will be. In the photo, each strip is 3 mm wide.


5. Fold the rectangle with the cut strips over your index finger to create a soft bend. If you bend the paper too much, you won't get the delicate, loop-like curve of the petals.
Tip: To create a soft curve, you can bend the paper over the body of a flashlight or over the handle of a wooden spoon.
6. Before folding the paper, apply a little white glue to the wrong side of one of the corners of the narrow edge. Do not apply glue along the entire strip of the narrow edge, otherwise the flower will not form beautifully.


7. Fold and press two opposite corners of the narrow edges of the rectangle of paper and hold them until the glue dries. Remember that you only need to glue one corner, not the entire edge.


8. Starting at the corners taped together, wrap the paper tightly around a pencil or pen. Notice in the photo: the pencil protrudes above the paper loops. This is done so that the loops do not get tangled. When wrapping paper around a pencil, try to align the unglued edges.
Forming a flower
9. When all the paper is wrapped around the pencil, secure the edges with a drop of glue and hold them until the glue is completely dry. If you don't let the glue dry, your flower may unravel and the loops may become tangled and out of shape.
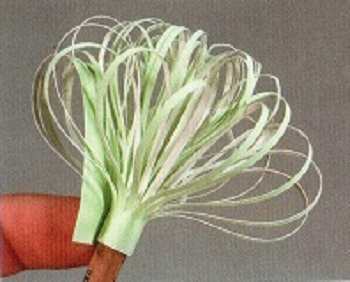

10. Carefully insert your finger into the center of the petals and gently bend them back into the shape of a blossoming flower.


11. Using a quilling stick, roll up a narrow strip of paper.
12. Insert the twisted strip into the base of the flower, allowing it to unwind slightly and completely cover the pencil hole left after step 8.

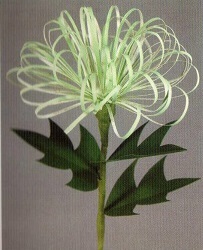
13. Squeeze a generous bead of white glue onto the roll inserted into the hole and allow the glue to dry completely. Insert a piece of floral wire into the roll to serve as a stem, after greasing the end with hot glue.

14. To give the flower a finished look, wrap green floral tape around the stem wire and add free-form leaves if desired.
Volumetric paper flower templates - beautiful<<Георгины>>
Here you and I will have to make templates and cuts in certain places. This will take time, but the result will be a reward for your patience and effort. Dahlias come in all colors, so choose the colors of paper you like best to work with.

Tools and materials:
- Cutting molds of different sizes
- Pencil, ruler, scissors or knife
- Paper of different colors, each color in different shades
- Coins of different diameters
- Green leaf paper
- Rigid floral wire
- Green floral ribbon
Master class - assembling a flower using templates
- We make a template (shape) for cutting. For work, 3 templates (forms) will be enough: with a diameter of 2.5 cm, a diameter of 5.1 cm and a diameter of 7.6 cm.
- Using a cutting mold, make 2 circles with a diameter of 7.6 cm, 2 circles with a diameter of 5.1 cm and 2 circles with a diameter of 2.5 cm. If you do not have cutting molds, cut out the circles with regular scissors.
Important note: it is recommended to use 6 circles for one flower, the color of all circles should be the same, only the shades of this color should be different. For example, it could be 6 shades of yellow or 6 shades of lilac. You can use 3 matching colors (or 2 matching colors), as well as the size of the circles (remember that 2 circles of the same size do not have to be the same color).


3. On the back side in the center of each paper circle, draw a circle as shown in the photo.
Tip: to draw a circle, you can use coins of a suitable diameter and trace them with a pencil.
4. Using a ruler and pencil, divide each circle into 8 equal sectors. Use scissors to cut radial lines. There is no need to cut the central circle.


5. Fold the edges of each sector inward to form a regular triangle.
6. To add volume to the petals, turn the circle right side up and pinch the end of each petal crosswise.


7. Fold circles of the same size in pairs as shown in the photo. Secure them together by dripping hot glue into the center. Let the glue dry completely.
8. Hot glue 3 pairs of circles in the center and press with the end of a pencil until the glue dries.


9. Cut out a circle with a diameter of 6.7 cm from green paper - this will be the cup of the flower under the petals. Fold it as you did in step 5, but instead of pinching the petals, place folds between them as shown in the photo.

Flower assembly
10. Place the flower and calyx parts on the work surface as shown in the photo.
Tip: The green paper should be smooth side up and the flower face down. Place a drop of hot glue into the center of the flower.
11. Carefully glue the cup onto the flower as shown in the photo.


12. To make the stem, wrap floral tape around the wire, twist one end into a loop and glue it to the base of the flower.
Tip: Raffia coated floral wire is thicker than regular floral wire and works great for this pattern's stems. You can use wire from a wire hanger to make the stem.
To do this, use wire cutters to cut the wire to the required length, straighten it, and then wrap it in green floral tape before attaching the flower to the end.
13. If you want to add leaves to the flower, cut them out according to the template and attach them to the stem with floral tape.


You can make these voluminous dahlias out of paper with your own hands.

Agree that the dahlia model was easy, simple and even interesting for the creative process.
Video on how to make a flower<<Ромашка>> with your own hands
You've seen how easy it is to make a daisy, so repeat all the steps and a bouquet of daisies will decorate your home interior.
Light paper flowers - beautiful<<Космея>>
Cosmea has a simple and at the same time complex shape. Translucent or parchment paper is perfect for this model; thanks to its translucent structure, the flower will look very delicate.

Cosmos flowers come in yellow, orange, red, pink and even white. Therefore, choose the color of the paper yourself.
Tools and materials:
- Mold for cutting a circle with a diameter of 5.1 cm
- Scissors
- White glue
- Hot glue gun and glue stick
- Pink translucent paper
- Strips of yellow paper measuring 0.3 x 15.3 cm
- Green translucent paper
- Green floral ribbon
Master class with step-by-step instructions
- Using a cutting mold, prepare a paper circle with a diameter of 5.1 cm. Fold it in half, then in half again, and fold the resulting quarters in half again. Using scissors, make cuts between the petals with a length of 6 mm to 1.3 cm, as shown in the photo.
- Unfold the piece and use your fingers to lightly smooth out the wrinkles.


3. Bend the edges of the resulting sectors inward, towards each other, to make 8 pointed petals.


4. Turn the flower over with the folds facing down.
5. Use scissors to cut off the sharp ends of the petals.


6. Roll a strip of yellow paper into a spiral. Secure the outer end of the strip with a drop of glue, and then place a drop of glue in the center of the flower and glue the spiral.


7. To make cosmos flowers look more natural, add half-opened buds. To make the bud, prepare a paper circle as you did in step 1 and fold the sectors with folds towards the center. Tuck the edge of the last petal over the edge of the first.


8. To make the bud half-open, fold it in half, and then straighten it and fold it in half perpendicular to the first bend.
10. Using scissors, cut out a narrow triangle in the folded circle, as shown in the photo.


11. Carefully unfold - you should have an eight-pointed star.

12. Glue a green cup under each flower. Hot glue the stem wire to the flower and bend it slightly to give the flower a natural look.
Corrugated paper flowers - video instructions
I hope that the proposed step-by-step instructions will help you make beautiful paper flowers, and you will be able to surprise your friends with your creativity.
Do you want to learn how to make paper flowers with your own hands? You've come to the right place! 🙂 Here we have prepared for you an excellent selection of photos and master classes, including new ones for 2019, designed for different skill levels: for beginners and for more experienced craftswomen. After all, you can make flowers from paper, both simple (children’s crafts) and complex ones that cannot be distinguished from real ones.
First, of course, you need to decide what kind of paper and what techniques you plan to use for your crafts.
Let's take a closer look at all the possible homemade paper flowers. By following the step-by-step photographs in the master classes, as well as videos from YouTube, you will learn how to make the same beautiful 3D flowers as a gift for a birthday, March 8, Teacher's Day or compositions for decorating a hall, classroom, room, photo zone decor and other premises for the holiday .
Corrugated paper flowers
Corrugated or crepe is the name given to thin crumpled paper from which various crafts are made. It is good because the flower elements can be made voluminous by slightly pushing apart the microfolds of the texture with your fingers, and you get flowers with curved, convex petals.
The simplest flower made of corrugated paper:
Pansies, buttercups
Cute and uncomplicated buttercups and pansies: to create wildflowers you need to cut out identical petals, which are combined and secured with wire or glued to a wooden skewer, the stem is wrapped in a strip of green paper.


Rose and rosehip
The simplest craft - corrugated paper rose, which even children can do.
We cut out 3 circles from red crepe paper, place them on top of each other, then roll them into a cone and staple them approximately in the middle. Then turn it halfway out and straighten the petals. We attach it to a skewer, which we wrap in green crepe paper. Glue the leaves. A simple rose is ready.


This is what a scarlet flower looks like:

Volume roses more impressively done like this:

Simple small roses in 10 minutes (how to make a flower out of paper -):


"Roses for Mom." Christina Matishina.
Made from corrugated paper.

And detailed instructions on how to make a basket with flowers with your own hands -
 This is such a beautiful bouquet:


Hyacinths
Spring flowers made of paper - hyacinths- also the simplest crafts.


"Flowers in a vase. Hyacinths made of corrugated paper." Senior group No. 5 of MBDOU No. 267 of Izhevsk. Teacher Kochurova G.V.

Peony

Beautiful and naturalistic peony It is obtained from tinted crepe paper: to obtain large voluminous petals, place a white piece of corrugated paper on a cup, spray it with water from a spray bottle, and straighten it to the shape of the cup. Paint it with yellow and pink paint and let it dry. We take the core ready-made or make it from yellow crepe paper, paste it with our lush petals.
Application “Basket of peonies” - a very beautiful three-dimensional postcard -

Narcissus
Daffodils And lotus —


Please note that the technique for assembling flowers is the same, but the shape and number of petals are different for everyone; this photo shows diagrams and patterns of petals and the shape of the core of different flowers:

These cutting stencils are easy to make with your own hands.
These simple paper flowers were sent to us by Tatyana from St. Petersburg. The manufacturing technology is simple, but the bouquet looks wonderful in this children’s craft.

Paper carnations from Masha Shevtsova.

Large growth flowers
Large flowers made of corrugated paper turn out simply chic, with them even an adult woman can feel like Thumbelina. It can be used to decorate a hall with your own hands for the holiday, a photo zone for taking beautiful memorable photographs, you can hang it on the wall or give it to the hero of the occasion. How to make voluminous growth peonies with your own hands is shown in this video:
Just giant roses:
There is a faster option - huge but simple flowers that can be hung on the wall of the photo zone:
As you can see, the size of the flowers is limited only by the original dimensions of the paper; real giants are made from huge paper.
Little flowers
You can also make miniature charming spring bouquets - apple or cherry flowers corrugated paper:


pink buds, snowdrops, coltsfoot,

crocuses and daffodils,

small poppies, cornflowers,

forget-me-nots... It all depends only on your imagination.


Making a flower using lollipop
Using a small ball (we took a lollipop), you can get a fantasy flower with very lush petals that will keep their shape, but it is advisable to grease the ends with PVA glue so that they do not unwind.

We cut out 5 squares from corrugated paper and wrap them around the lollipop so that the “tail” is longer on one side than on the other.


For the core, fold a strip of red crepe paper several times, cut the ends - these are the “stamens”.


We place the core between the long tips of the petals and wrap everything around the stem stick. We wrap the stem with a strip of green corrugated paper.

It turns out such an original flower with lush petals.

Snowdrops
Delicate first spring flowers snowdrops -


Swimsuit
Tender lights (swimsuits). For the petals, you need to cut out several identical circles, in which one edge curls into a tube, and the other expands and curves. For the core, a strip of paper is cut and rolled into a roll. By the way, see how to make a swimsuit from foamiran.

Chrysanthemums, daisies, carnations
All master classes on making these flowers from crepe paper are on a separate page


Sunflower
Craft made from crepe paper and real seeds. :


poppies
Charming flowers - poppies made of crepe paper - :
Crocuses
Crocuses are spring flowers, so they are often made by March 8th. You can make a simple and cute bouquet of flowers -.


Corrugated paper flowers with candies
Corrugated paper makes excellent
The simplest children's option tulips made of corrugated paper with candies. On March 8, we decided to make tulips for our teachers, because these are the most spring flowers. We chose truffles from the candies, and decided to try making the stems without skewers. For this we needed:
- thick green double-sided paper,
- red corrugated paper,
- red threads,
- glue (stationery or PVA),
- as well as packaging film for flowers and ribbon(the bouquet should look like a real one).
For the stems, we cut green paper into strips and twisted them into spirals.
Elongated petals, pointed on one side, were cut out of red corrugated paper, six pieces for each flower. Use your fingers to carefully spread the fibers in the middle of the petal so that it becomes slightly convex.

The candy was inserted into the spiral of the stem, twisted tightly and glued.

Then they wrapped the candy with petals, like a real tulip - three inside and three outside. In order not to fuss with glue (such thin paper under the liquid glue, one might say, melts), we simply tied it with red thread to match the paper.

Leaves similar in shape to the long leaves of a tulip were cut out of green paper and glued to the bottom of the stem.

Two more of these flowers - and the bouquet is ready. All that remains is to wrap it in film and tie it with a ribbon.

The paper tulips are ready, there are three bouquets.

You can take it to kindergarten and give it to them.


Simple clove
Another option for assembling a flower from corrugated paper without glue is to string the edge of a long strip onto a thread, like pompoms, but here you need to be very careful so that the thin paper does not tear.


The result is a carnation flower - quick and easy.
Flowers from napkins
Very easy to do crafts - flowers made from paper napkins.


These crafts are very simple and easy for children. Photos and step-by-step description of Elena Ermasheva on how to make bouquet of napkins with your own hands.

For such an original bouquet you will need:
- paper napkins: yellow and pink (35 pieces);
- bamboo kebab sticks (13 pieces);
- PVA glue;
- bronze acrylic paint with glitter;
- green paint;
- brush;
- scissors;
- felt-tip pen or pencil;
- plastic jar;
- decorative shavings;
- satin ribbon;
- linen fabric;
- 0.5 liter plastic bottle;
- small pebbles.

Paint the sticks with green paint and let dry.

For a bouquet of 13 roses you will need 117 circles with a diameter of 8 cm, 9 pieces per 1 flower. Cut out the required number of petal blanks.

For 1 flower you need to fold 7 circles in half.

Grease the edge of the fold of each circle with glue. Place the stick on the semicircle and twist the petal onto the stick.


In this way, carefully glue the remaining petals.


Pierce two circles in the center with a stick.

Lubricate the top circle with glue in three places. Glue to the finished petals.

Glue the last circle in the same way, the flower is ready.

Let's do it vase for a bouquet.


Flowers made of colored paper


For voluminous flowers you will need special double-sided paper. Regular school colored paper is also suitable for applications.
The simplest bouquet made of colored paper
Making such a bouquet from colored paper with your own hands is quite simple. Even a child can cope with this task. That’s why this craft is a great gift for mom.
If the child is not yet good with scissors, parents can help him. And you shouldn’t interfere with the rest of the process. Creativity with children is an important part of parenting. It develops creative thinking and a sense of beauty. In addition, the child sees the mother’s joy from the gift received and becomes happy himself.

Materials:
glue;
colored paper;
scissors;
pencil.

Guide to creating a bouquet from colored paper
Take a whole sheet of green colored paper. Lubricate the long edges with glue. Fold the sheet in half horizontally so that the edges stick together. We cut the paper from the fold to the gluing point to a width of 1 cm.
 Lubricate the base of the workpiece with glue.
Roll the paper into a tube. Secure with paper clips until the glue dries.
 Cut out flower blanks. We use several shades. It will be more convenient to first draw a template, and then cut out the flowers along the contour. Several yellow circles will serve as flower cores.
 Glue the centers to the flowers.

We glue each flower to a separate piece of colored paper.
 Distribute the flowers evenly throughout the bouquet. We straighten the leaves. The children's bouquet is ready:

Making a flower with a child
Paper flowers are a great gift option for mom. This craft is simple to make and looks much better than real flowers. This step-by-step tutorial describes the process of making a paper flower.
For a flower arrangement you will need the following materials and tools:
1. Cardboard (yellow and green).
2. Red corrugated paper (can be replaced with a napkin).
3. Stationery glue, pencil, scissors.
4. A small piece of plasticine.
5. Bottle cap.

Step 1:
The flower will consist of three flower blanks of different sizes. From yellow cardboard you need to cut out three flowers of the same shape, but different in size (from largest to smallest). For convenience, you can first draw the shape of the flower with a pencil and then cut it out. Glue the pieces together. The largest flower should be at the bottom.


Step 2:
Using a pencil, curl each petal down: place the pencil under the petal, press with your finger and pull down to the tip, twisting slightly. These actions will make the flower lush and voluminous.

Step 3:
For the middle of the flower you will need corrugated paper or a red napkin. You need to cut a strip about 3 cm thick, then cut many narrow strips up to the middle. Roll the workpiece and cut again. There is another way: just cut the paper into small pieces. Apply glue liberally to the middle of the flower and glue red pieces of paper.


Step 4:
You can make leaves like this: fold green cardboard in half, draw half of the future leaf at the fold and cut it out. There should be two such leaves.

 Step 5:
To make the stem you will need green cardboard. You need to cut a strip 2-3 cm wide from it, roll it into a narrow roll and secure it with glue. Cut the upper part of the stem into four parts.

Step 6:
All the parts are ready, all that remains is to connect them together using plasticine. It must be applied to the top of the stem and secure the flower. The leaves are attached using the same principle. Glue the flower onto plasticine to the bottle cap. This will be a stand for the craft.

The paper flower is ready.

“Postcard for March 8th!” Safonova Svetlana Alexandrovna.
Application made of colored paper. Gift card for March 8th.
We will need colored paper in red, purple, light green, yellow, and green. It is advisable to use glossy colored paper. Cut out three flowers of different shapes. Large, medium and smallest, and so on three times. Then we glue first a large flower onto the folded cardboard, then a smaller one, and so on three times. Cut out a vase from purple paper and glue it onto the card. We make three yellow circles, make the centers into our flowers and glue them. Then we cut out three stems and glue them from the flowers to the vase. Cut out the green leaves and glue them on. This is how the card turned out!

This video shows how to make paper daisies, they look very naturalistic, almost life-like:
The flowers turn out so realistic that they are difficult to distinguish from real plants.
Daffodils. Master Class
This master class describes how to fold daffodils from colored double-sided paper.

To work you will need:
· simple pencil;
· School line;
· scissors;
· double-sided colored paper in orange, yellow and green shades;
· PVA glue;
· thin wooden sticks;
· small vase.
Description of work
Take half a standard sheet of yellow double-sided paper. Prepare a ruler and a simple pencil.

Draw squares with sides of 5 cm on a piece of paper. Cut them with scissors according to the graphic design. For 5 colors you need to prepare 10 squares.

Take 1 square and make 4 cuts on it, as shown in the photo. Then take 1 wooden stick or pen rod and slightly twist the corners of the paper blank.

This will form your petals. For one flower you need to prepare 2 identical blanks.
Glue them together so that the petals of the top piece are between the petals of the bottom piece.
To make the center for the daffodil, you need to cut out a circle from orange double-sided paper. After this, bend the circle using a rod, as shown in the photo.

Glue the center to the center of the yellow blanks. One flower is ready.

Using the same principle, make 4 more flowers. This is how daffodils turn out.

To make stems, prepare thin wooden sticks and strips of green double-sided paper.
Just cover the sticks with green stripes and the stems are ready.
Cut thin long leaves from green paper. Using scissors, slightly curl one end of each leaf.

Glue 2 leaves onto the stems.

Now all that remains is to fix the buds at the top of the stems.

Beautiful artificial flowers look no worse than real ones.

Collect them in a bouquet and place them in a low narrow vase. They look amazing!
The advantage of such a bouquet is that you can admire its beauty for more than one day, because the paper will never wither.
Daffodils are not the only flowers that can be made. Experiment and your home will be decorated with a variety of flowering plants. For example, the faithful companion of spring daffodils are tulips, how to make them from paper easily and simply, look at the video:
Blue forget-me-not flower made of watercolor paper
You can make beautiful voluminous flowers for decorating cards and gift boxes with your own hands. There is such a wonderful direction in needlework - paper-plastic, which allows you to create incredibly beautiful flowers and bouquets. Thanks to the plasticity of watercolor paper, making flowers for scrapbooking is not difficult.
Necessary tools and materials for forget-me-nots:
- Blue watercolor paper;
- Scissors;
- Stencil in the form of a flower with 5 petals;
- Container with water;
- Ball tool;
- Sponge;
- Soft cloth;
- PVA glue;
- Pearl half beads.
Description of work
First you need to make a stencil of a flower with five petals: you can draw it by hand or print it on a printer. Using a stencil, cut out an even number of flowers from watercolor paper.

Place flowers in water for 5-10 minutes. Don’t be afraid to overexpose it, watercolor paper is quite thick and takes a long time to soak in water. After the allotted time, blot the workpieces with a napkin to remove excess liquid. If you can't find colored watercolor paper, you can color plain white paper with food coloring, gel pens, markers or gouache. This should be done while the paper is wet.

Place the flower on a damp soft cloth. Using a tool with a ball at the end or any other object with a rounded end (for example, the tip of a pen, brush), press on the edge of the petal and move it forcefully towards the center. Do the same steps with all the petals. This will give the flower some relief.


Now transfer the flower to a thick sponge and press down the center of the flower. Here the recess should be larger than in the petals.

After squeezing out the petals, turn the second flower inside out and press it in the center in the same way.


You should get these two types of flowers: with petals curved up and down.
Place the flowers on a flat surface and leave until completely dry. Dried flowers turn out very hard, reminiscent of cardboard.
Now it's time to assemble. Glue a flower with petals inward into a flower with petals curved outward. PVA glue is great for watercolor paper.

Glue a half bead into the center of the flower.

The embossed watercolor paper flower is ready! These flowers were used for decoration. Flowers made from watercolor paper are quite rigid, so they can be used to decorate wicker boxes and baskets, and also be used as interior decoration.

Easter bouquet of snowdrops. Zabrodina Anna.

"Snowdrops". Klementyeva Polina and Aleksandrova Oksana.
A very cute picture, but despite this, it is not at all difficult for children from 5 years old. To make it you will need half a sheet of blue cardboard, a white sheet, a green pencil or felt-tip pen, green plasticine, a napkin, and glue.

Simple DIY paper flower
From ordinary white paper, using a very simple method, you can make beautiful, elegant flowers that will definitely find use in your creativity. First of all, this is the creation of voluminous cards using the technique, which is often practiced by needlewomen, and these flowers can be collected in a bouquet or simply added to a flower arrangement. A small, lush accent will definitely attract attention to a wall newspaper or ad, a beautiful box or package.

What you need to prepare to create such a flower:
White office paper;
water and brush;
gouache or watercolor paints;
scissors;
glue;
decorative stamens;
a piece of thin wire.
How to make a lush flower with your own hands step by step
1. The list of materials used deliberately does not indicate the colors of paint and decorative stamens that can be used to create a flower, because they can be chosen according to your wishes. The base of the flower is ordinary white office paper, and then you can paint the product with any colors, according to your taste or need. First you need to take scissors and a sheet of white paper.
2. Cut out the first flower with oblong petals, 6 pieces, from paper. But the shape of the flower may be slightly different, but it is desirable that the petals be oblong.

3. Using the first flower as a template, cut out 6 equal layers of white paper. The more layers you use to create a list, the more magnificent the product you will get. You don’t have to worry about evenness and accuracy.

4. Using a brush and plain water, wet the petals. Dip the tip of the brush into water and brush over the petals as if painting them.

5. While the paper is still wet, squeeze each petal, conveniently using the same brush or pen, applying it to a rounded surface. This way, you will not only bend each petal into a kind of accordion, but also make them turn outward.

6. Do the same procedure with all the other petals, leave all layers to dry.

7. While the layers of the flower are drying, prepare a bunch of stamens. Since a white and yellow flower is shown here, the stamens were chosen accordingly. Take 6 or 7 double-sided stamens of white and yellow color, use a wire to find the middle and bend in half to get a bunch. Twist the end of the wire until it becomes sharp. In the future, the wire will help secure the stamens in the center.

8. Begin to fasten the dried layers of the white flower. Glue the second layer onto the first layer, moving it.

9. Then glue all other layers in the same way. Here is a preparation for a lush flower.

10. Make a small hole in the center of the flower with scissors and stretch the tip of the wire, fixing the stamens. Cut the bottom of the bush and coat it with glue.
11. Choose a paint color and lightly paint over the top of the flower, leaving white gaps to make it even more elegant.

12. A beautiful handmade paper flower is a great addition to.

Simple autumn bouquet - aster
An autumn bouquet made of paper will be an interesting DIY craft for children. Autumn is the time of year that gives us colorful colors and incredible materials for creativity. The craft is a bright bouquet, decorated with flowers that look like asters, autumn leaves and a bow.

- set of cardboard and paper;
- scissors;
- glue;
- black capillary pen;
- half beads-crystals;
- brocade bow;
- maple leaf template (or a special hole punch in the shape of any leaf).
How to make an autumn bouquet step by step
Prepare cardboard and paper for work. Thick paper (in this case green was used) is needed to create the base. You can also prepare waste cardboard from packaging or colored plastic for this purpose. The bright sheets from the set are essential for creating flowers and leaves. If you use single-sided paper for flowers, the reverse side of which is white, you will get interesting two-color buds.

From a thick sheet prepared for the base, cut out a piece shaped like a bouquet. The upper part will expand, and the lower part will have a tail, like a bouquet.
Cut out several maple leaves (or you can prepare blanks of a different shape, for example, oak, chestnut or birch leaves). It is better to use yellow, orange, brown or red paper for this work. Use a capillary pen to apply veins. The leaves should be small - this is an addition to the bouquet, which echoes the autumn theme. Make 5 or more blanks.
Glue the prepared leaves onto the base. You can glue four on top, one on the bottom, or distribute them as you wish.

Additionally, cut out oblong leaves. These are directly the leaves of the asters, which will become the central decoration of the postcard. Curl each leaf with the same scissors. Long details are a decoration for the bouquet.

To create buds, prepare thin brushwood from pink paper. Cut the leaf into thin strips and divide each into segments about 10cm or so long.

Fold each piece into a loop, overlapping the edges on top of each other. The reverse side of the paper may be white.
Cut circles for flowers from paper of any color. Lubricate the circles with glue and begin to apply loops around the circumference, forming flowers.

Glue on two or more rows of loops to create full buds. Decorate the centers with half beads. You can choose half beads to match the flowers or use yellow details.

Model three or more aster flowers to decorate the bouquet.

Glue autumn flowers in the center of the bouquet.
Decorate the lower part of the composition with a brocade bow to disguise imperfections and make the bouquet look complete.
An interesting autumn paper craft is ready.
Chamomile
For example, to do paper daisy, cut out two blanks from white paper and several from yellow, glue the core onto the main shape:
Rose
For roses It will take more preparation and effort, but the result will be impressive: fold the square of scarlet paper twice in half and once diagonally. Cut off the tip and wide edge in a semicircle, make 4 such layer blanks with 8 petals. To create volume, cut one side of the workpiece and glue it together to create different widths of the workpiece: 6, 5, 4 and 3 petals. Twist the petals, insert the layers into each other and glue them. Fold the leaves of green paper like an accordion.
"My scarlet rose." Sivolapova Polina.
To make this rose, you needed red double-sided paper (colored printer paper).

Another interesting option is two-color: here you will need not only scissors and glue, but also a stationery knife for cutting.

A simple option on how to quickly do it. Fold 2-3 sheets of paper into one accordion, tie them in the middle, and trim the edges in a semicircle. All that remains is to gently fluff the petals:
Simple flowers
Simple flowers can be done in a spiral way: on a sheet of colored paper, draw a classic spiral or a wavy one with petals, cut it out and twist it into flowers.


Dahlia
And even if you make circles of paper of different diameters and cut out petals in them, you will get a very lush flower - a dahlia.
Flower made from curled strips of paper.
Another option how to do it ribbon rose, paper or fabric, simply bending the petals at the desired angle and rolling them into a roll:
Video from YouTube:
Hyacinths Elizara Polyakova:

Large flowers for the photo zone
Flowers for office Decorations for photo shoot locations can be made from double-sided colored paper.
For example, in this video, paper with a density of 160 g was used, 15 - 24 pieces were needed. Templates can be found, for example, here: //pl.pinterest.com/pin/789818853371506785/. How to make a photo zone from paper flowers:
For a photo zone you need a frame on which the canvas is stretched, and then flowers are attached to it with wire and hot glue:
Another option is to make beautiful hanging compositions, for example, these:
Paper flowers opening in water
You can spend interesting time with a small child at home. This simple but fascinating miracle craft will interest your baby. Making flowers together will bring pleasure to everyone.

You will need:
- colored (both sides) xerox paper;
- office white paper;
- colour pencils;
- glass of water;
- white shallow plate;
- stapler,
- circle templates with a diameter of 6, 10 and 12 cm (for more complex color options).


Simple option
Draw several flower options on a white sheet of paper, approximately 4-5 cm in diameter with not very large petals. Available in different colors and petal shapes. Now they need to be cut out. Bend the petals of each flower into the center in a circle, one on top of the other.


 When the flowers are ready, place a plate and pour some water into it. Now you can lay out the paper flowers with the folded petals facing up. And then an amazing transformation will occur. All the petals will open and flowers will bloom on the water.
This action occurs because the paper absorbs water and tries to return to its original form. This means that it straightens in places where it is folded. It turns out that the flower is blooming.

 Flowers can be immediately cut out from colored xerox paper. You can glue something funny or draw something inside the flower. Optional.
More complex option
Option #1. The original flower can be made large in 3 layers. Take xerox paper and staple it in the middle. Using the template, draw two circles with a difference of 2 cm between them. Draw petals in the resulting donut. The finger will serve as a template. Cut out the flower, taking three layers at a time.
Now fold the petals correctly in the center. One after another, overlapping each other. And so on for all three circles. All that remains is to launch it on the water and see. The flower will open layer by layer. The baby will love it.


 Option number 2. This flower can also be made in 2-3 layers. Only now the difference between the circles will be 4-5 cm. You will get long petals. Now each petal must be twisted inward with a pencil. You can use a thinner diameter.
Origami flowers
Flowers made using the origami technique, of course, are not so similar to real ones, but they have their own charm. In addition, this technique helps develop fine motor skills, which is very important for children, and adults too. How can such original things be made from an ordinary square of paper?
Calla lilies
Paper is most often used to make children's appliques. We suggest adding some chenille wire to it and making beautiful flowers that look like elegant calla lilies. And when creating the flowers themselves, you can introduce the child to the basics of origami techniques. The entire process of making such an application is given in this master class.
To create such a craft, we prepared:
- white cardboard;
- red, orange, pink and green paper;
- glue;
- chenille wire;
- pencil;
- scissors;
- ruler.

The flowers for this application will be made of colored paper using the origami technique. Therefore, initially we prepare a square blank. In our case there will be a square with a side of 8 cm.
 Fold it in half diagonally.
 Now let’s unfold the blank of the future flower and begin to bend the sides towards the middle line.
 You need to bend it symmetrically on both sides.
 Next, we bend the upper parts of the bent elements back. We try to do this symmetrically. This is the template we have for a flower.
 The center of the flower will be a piece of chenille wire. It is enough to take about 4 cm. We use orange chenille wire, but if desired, such a center can be made of chenille wire of any color. We fix this piece with PVA glue.
 We bend the bottom corner of this flower to the reverse side and glue it.
 In a similar way, we make flowers from pink and orange paper.
 Now we distribute the flowers on white cardboard, and then fix them with glue.
 We cut out narrow strips from green paper that will become the stems on our applique.
 We also make flower leaves from green paper. To do this, fold it in half, and then cut out the outline of half the leaf. We cut out 3 leaves of different sizes. We glue them onto our craft. The applique with flowers made of paper and chenille wire is ready.
Video on how to make spring lilies of the valley. Valeria uses a large sheet of paper to make it clearer, but for miniature flowers you need to take 5 x 5 cm squares and repeat after the author:


Volumetric paper flowers are excellent decorations for the hall and room. Making them yourself is very easy, all you need to do is be patient. You can make flowers from regular colored or corrugated paper. To do this, it is enough to have the diagrams and templates that we offer on the site.
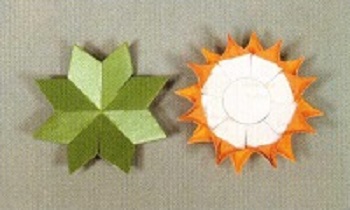
The Scarlet Flower
You can start a master class on making this craft with your own hands by choosing paper. This can be plain red or dark orange paper. If you can find a double-sided one, it will be even better.
A master class and step-by-step instructions on how to make a “scarlet flower” with your own hands will look like this:
- To make a “scarlet flower”, select a square blank as the base.
- Fold it in half and connect the corners.
- We also fold the side corners inward.
- Then we unfold the corners so that the double fold is visible.
- We connect the corners so that the folds are on the inside.
- We glue several of these blanks together and get a flower.
- You can use glitter or rain as the middle.
Several of these flowers can be combined into a bouquet and given to your loved ones. Look at the photo to see what this flower looks like.
Peony
Master class on how to make a peony out of paper with your own hands, you can start by preparing light A4 paper. Flowers can be made in different shades that you like, from white or light pink to dark red. In the latter case, it is better to choose double-sided colored paper. Such flowers are suitable both for decorating the hall and as a decorative element of the room.
The master class and step-by-step instructions on how to make a peony with your own hands look quite simple:
- Fold a sheet of paper like an accordion along its entire length.
- Fold it in half and tie it with a thread in the middle.
- Prepare a few more of these “accordions”.
- Tie the pieces perpendicular to each other, placing one layer on top of the other.
- The result should be a lush, voluminous flower.
You can see how it looks in the photo here
Other options
A master class on making flowers with your own hands can be carried out using special preparations. Templates and patterns for artificial flowers can be found in large quantities on the website.
The step-by-step instructions for making it yourself will look simple:
- Print the templates on a printer and transfer them to colored paper.
- Cut out the blanks.
- To make flowers with your own hands, just combine several blanks and fasten them in the shape of a flower.
A master class on how to make paper flowers with your own hands using templates is perfect for making wall decorations (flowers can be strung on a fishing line or thread and making a garland), artificial bouquets of daisies, camellias and other flowers with many straight petals. A flower garland will be an excellent solution for festive decoration of the hall.
This is what the master class looks like with step-by-step instructions and the finished flowers in the photo:
Corrugated paper
To make flowers from corrugated paper with your own hands, you need to take into account the characteristics of the material. This paper itself gives the product additional volume, but to enhance it you will need some tricks. Let's conduct a master class on how to make a tulip from corrugated paper.
- Cut a small piece of corrugated paper into a rectangular shape to fit the flower and slightly round the edges.
- To make the petal acquire a convex shape, you can slightly wet it (just a little so that the paper does not spread) and place it on the back of the tea cup.
- Let the paper dry. Do the same with all the petals.
- Prepare the stem. It can be made from a stick or thick wire wrapped in green crepe paper. As a center and to secure the petals, you can use a special base in the form of a semicircular mesh, as in the photo.
- Secure the corrugated paper petals to the stem or base so that there are no gaps between them.
This is what the step-by-step master class and the finished flower look like in the photo
Rose
The master class on making a rose is very similar to the instructions on how to make a tulip with your own hands. The differences will be in the shape of the petals and their preliminary preparation.

A master class on how to make paper flowers with your own hands, in a simplified form, is perfect for kindergarten or primary school. Children will not only develop fine motor skills, but also aesthetic taste and show creative interest. The flowers can then be used to decorate the classroom.
You can easily conduct such a master class at home. You just have to stock up on scissors, paper, glue and patience, and the skill will come with practice.


