"Dedicated to the crazy people"
If your desires to build a model railroad exceed the capabilities of mass production, it’s time to think about making your own models. There are different materials and technologies - here we consider manufacturing from cardboard.
First of all, you should stock up on everything you need.
First you need good white cardboard (preferably 0.35 - 0.5 mm - determined by eye using a ruler).
You also need the right tools:
- mechanical pencil with a 0.5 mm lead,
- PVA glue,
- ruler 30 cm,
- corner,
- eraser,
- threads (preferably not very fleecy),
- transparent plastic, double-sided tape,
- two types of emery (coarse and fine),
- paper knife, regular scissors,
- manicure scissors,
- clothespins (preferably plastic with flat surfaces),
- and also some other little things, which will be discussed below.
And most importantly, you need a sincere desire to make a layout!
Here we will consider the production of a model on a ready-made chassis. As a donor, you can use cars from the TT-model or VTTV.
When producing any model, reference materials are required in the form of drawings and illustrations of the modeling object. To save time, I also used the DMV from the TT model.
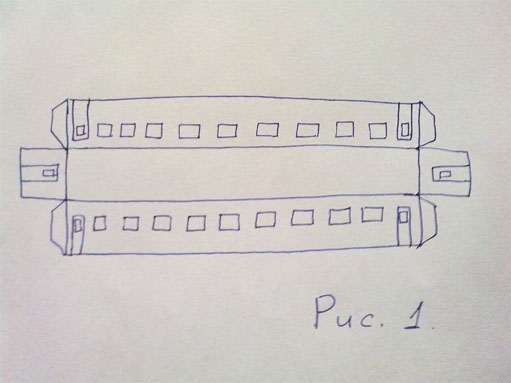
So, let's begin. If a drawing is used, then all dimensions must be recalculated to the appropriate scale, in my case - 1:120. Next, on a sheet of cardboard, you should draw a basic layout of the car WITHOUT a roof (the result should be an elongated parallelepiped without a floor) ( Rice. 1).
On it we draw everything that should be on the walls of the car, i.e. windows, doors, lines where there should be stiffeners, etc. After everything is drawn, we cut through all the windows with a knife.
Now it is necessary to increase the rigidity of the future body– on the back side you need to glue a second layer of cardboard with already cut windows onto the walls so that the windows coincide with each other ( Rice. 2).

Since cardboard has a bad tendency to swell when wet, you don’t need to spread a lot of glue, but quickly and thinly spread one side and immediately press it firmly and put it under a press.
Now let's deal with the stiffeners. They are made from threads that are glued along the drawn lines: first, an adhesive strip is applied, onto which the thread is then applied and pressed with a finger. The idea is to saturate the thread with glue and remove excess glue from the surface. Once all the ribs are glued on, it's time to outline the doors. To do this, cut a thin groove along the contour of the door with a knife. After this, we coat the cut out contours of the doors and the already glued threads. When everything has dried, you need to carefully walk over the surface of the threads with fine sandpaper and coat it with glue again. During all coatings, we try to leave as little glue as possible so that unnecessary irregularities do not come out later. Handrails are made from thin strips of cardboard.
Now it's time to start assembling. We press down the folds on the reverse side with scissors. Then we cut it out, carefully bend it and glue it together ( Rice. 3).

Carefully sand the rough protruding cardboard in the gluing areas.
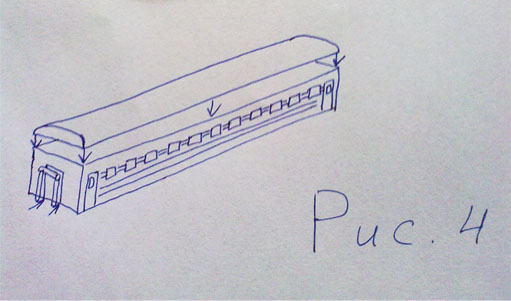
Roof. To get the roof of the desired shape, you first need to create a parallelepiped from layered cardboard, the height of which is equal to the height of the roof itself (usually painted gray). The width and length should be 1 and 2 mm greater than the width and length of the car blank, respectively (these are approximate figures). This is necessary so that after gluing the roof (by the way, it is also advisable to glue it using a press), it can be sanded on the sides and thereby adjusted to the size of the car. Next, the roof needs to be given a convex shape - to do this, draw the roof profile from the ends and cut off the excess longitudinally. After this, we sand first with coarse sandpaper, and then with fine sandpaper. After this, coat the roof with glue and wait until it dries. We process with fine sandpaper and repeat the operation. Now you can glue the roof. If you can find something to hold it down with while it dries, that will be good. If the original has stiffening ribs on the roof, they are made in a similar way using threads. We coat the junction of the roof with the body with glue. After this, air intakes can be attached to the roof. We glue cardboard at the ends of the car to hide the joint, although, depending on the situation, you can do without it. Using toothpicks, transitional soufflés are made ( Rice. 4).
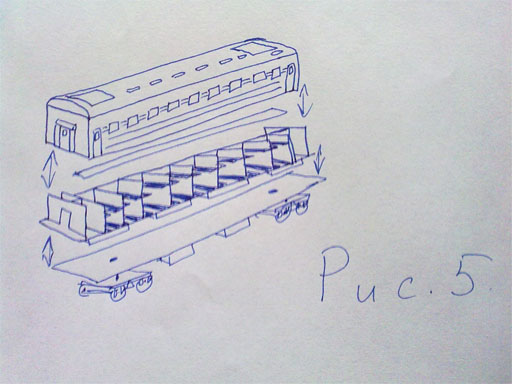
Let's talk a little about the insides. First you need to make a floor from 2-3 layers of cardboard. Next, we mark on it a diagram of the partitions, which, after cutting, we “put” on glue. The total height of the interior with the floor should be selected taking into account the height of the chassis. We glue the upper shelves to the walls, but the lower ones will most likely have to be glued to the floor. After this, a strip of cardboard 1 cm wide and 2 cm long less than the length of the car is glued on top of the partitions.
Now you can paint. It is advisable to use water-indelible paints. You can use aerosol, regular oil or special model paints. Next we use tape and brushes of different sizes to obtain the desired color.
When everything is dry, we glue strips of transparent plastic on the inside of the walls of the car using double-sided tape. From the inside, we stick double-sided tape onto the roof, and then press the insides of the car to it. We again glue double-sided tape to the floor of the car from below and press the chassis to it ( Rice. 5).
The car is ready!
Watch also the video on how to make a freight car out of cardboard.
Tatyana Gurova
The wheels are knocking, knocking,
Our the train rushes into the distance,
And the smoke from the locomotive -
Whitish veil.
Half the sky closed from us,
And the steam locomotive “Tutu-tu,”
It buzzes, “I’ll be here before lunch.”
I'll bring the kids.
I'll arrive at the station,
Without delay, on time,
Then I'll go to the depot,
And I'll sleep there for an hour"
I. Shevchuk
Take a sheet paper A4 format and fold in half

Then, unfold the sheet and bend both sides towards the middle

Form a rectangle and cut it out of the strip paper window, paste

Then we cut out the circles and also glue them on.

That's it, one trailer is ready. Other trailers are made using this principle.

When we did train, the guys cut out the windows themselves from strips paper, and the wheels are made of squares.

Publications on the topic:
A path runs through the meadow, dives to the left, to the right. Everywhere you look, there are flowers all around, and knee-deep grass. Green meadow, like a wonderful garden, fragrant and...
Making flannelgraph. Master Class. Lushnikova M.V. – teacher. I have long wanted to have a flannelgraph in my group, but I had to get plywood.
Late autumn has arrived. The earth was covered with an autumn carpet. This inspired me to create an autumn gramophone and write a poem Poem.
GOAL: development of creative musical abilities in children. OBJECTIVES: - to give an initial idea of the wide possibilities of noise.
For work you will need: scissors, colored crepe paper, a glue brush, glue, black cardboard, cardboard for a template, a board, a stick.
Labor training lesson in 4th grade
Topic: “Making an open box from thin cardboard”
Teacher: Sedochenko Yu.A.
Subject:
“Making an open box from thin cardboard”
Goals:
1. Practice cutting cardboard along the markings using a knife (ritzovka). Teach children to connect the sides of the box using flaps. Continue to work on developing the ability to plan your activities.
2. Correct fine motor skills, visual-figurative thinking, oral speech, voluntary attention, long-term memory, spatial concepts.
3. Cultivate basic personal emotions: hard work, accuracy, positive attitude towards work, responsibility.
Equipment: a rectangular blank for a box with marked lines, a stack, a ruler, a glue stick, cards with words for drawing up a work plan, cards with proverbs, cards with sentences for reflection, a box with pieces of various materials, a bag with three boxes (for sweets, for tea , for washing powder).
During the classes.
1.Organizing moment
Teacher. The bell has rung for you.
Everyone calmly entered the classroom.
Everyone stood up at their desks beautifully,
We greeted each other politely.
They sat down quietly, with their backs straight.
I see that our class is no different.
We will start a labor lesson.
2. Activation of mental activity
– A guest came to our lesson.
(A student comes in wearing a crown, a cape, with a handbag over her shoulder and a box in her hand)
I am the queen of material.
We can’t count the different products,
But for a dress, a pen, a spoon
There are different materials.
Fabric, paper and rubber
Everyone needs it for work.
Please take the material
And rather guess.
Remove from the box with your eyes closed and identify the material by touch.
(cardboard, metal, rubber, glass, leather)
– Determine by eye what the queen’s crown and cape are made of.
– Which of these materials did we work with in the last lesson? (cardboard)
-What did we do?
3. Announcing the topic of the lesson
Today we will continue the work of making an open box and make the same one the queen brought us. When making it, we will learn how to connect the sides of the box using valves and repeat the “ritzovka” technique.
4.Working with a proverb
– In our work we must follow this wise saying.
All work is easy for a working hand.
Read and explain the meaning.
5.Checking the workplace
– List the tools and materials that we will need in the lesson.
6.Dynamic pause
7.Drawing up a work plan
On the board there are cards with the words: we will draw, sculpt, bend, embroider, decorate, glue.
Remove the names of activities that are not suitable for making this box.
Arrange the remaining words in order of completion of the work.
1. We will recite.
What does it mean?
Why do you need a ricochet?
2. Bend.
To bend the sides of the box, you need to cut along the line one side of the square at the corners. It will work out valve for gluing. (a new vocabulary word is posted on the board)
3. Glue.
4. Decorate.
We will decorate the box according to the sample. To do this, cut out circles from red paper and leaves from green paper and paste them onto the sides of the box.
8. Repetition of safety rules when working with glue and scissors.
-For two operations we will need scissors.
What should you remember when working with scissors?
Pictures are posted on the board, from which children give answers.
9.Independent work
Children perform work while pronouncing the nearest operation
Stage 1 of work.
Stage 2 of work.
Dynamic pause.
Stage 3 of work.
Stage 4 of work.
10. Exhibition, grading
The Queen of Materials helps the teacher assign grades.
11.Practical application of the product
– The Queen of Material left various boxes in her bag. Guess what these boxes are made for.
What might our boxes be used for? (for labor lessons, for counting material in mathematics lessons, etc.)
12. Reflection
What did we make?
What did you learn in the lesson? Choose an answer from the sentences on the board.
Make markings using a ruler.
Cut the cardboard with a knife.
Glue the box using flaps.
– Express your attitude towards the lesson using emoticons.
infourok.ru
Cardboard cars
“Dedicated to the crazy people”
If your desires to build a model railroad exceed the capabilities of mass production, it’s time to think about making your own models. There are different materials and technologies - here we consider manufacturing from cardboard.
First of all, you should stock up on everything you need.
First you need good white cardboard (preferably 0.35 - 0.5 mm - determined by eye using a ruler).
You also need the right tools:
- mechanical pencil with a 0.5 mm lead,
- PVA glue,
- ruler 30 cm,
- corner,
- eraser,
- threads (preferably not very fleecy),
- transparent plastic, double-sided tape,
- two types of emery (coarse and fine),
- paper knife, regular scissors,
- manicure scissors,
- clothespins (preferably plastic with flat surfaces),
- and also some other little things, which will be discussed below.
And most importantly, you need a sincere desire to make a layout!
Here we will consider the production of a model on a ready-made chassis. As a donor, you can use cars from the TT-model or VTTV.
When producing any model, reference materials are required in the form of drawings and illustrations of the modeling object. To save time, I also used the DMV from the TT model.
So, let's begin. If a drawing is used, then all dimensions must be recalculated to the appropriate scale, in my case - 1:120. Next, on a sheet of cardboard, you should draw a basic layout of the car WITHOUT a roof (the result should be an elongated parallelepiped without a floor) ( Rice. 1).

On it we draw everything that should be on the walls of the car, i.e. windows, doors, lines where there should be stiffeners, etc. After everything is drawn, we cut through all the windows with a knife.
Now it is necessary to increase the rigidity of the future body– on the back side you need to glue a second layer of cardboard with already cut windows onto the walls so that the windows coincide with each other ( Rice. 2).

Since cardboard has a bad tendency to swell when wet, you don’t need to spread a lot of glue, but quickly and thinly spread one side and immediately press it firmly and put it under a press.
Now let's deal with the stiffeners. They are made from threads that are glued along the drawn lines: first, an adhesive strip is applied, onto which the thread is then applied and pressed with a finger. The idea is to saturate the thread with glue and remove excess glue from the surface. Once all the ribs are glued on, it's time to outline the doors. To do this, cut a thin groove along the contour of the door with a knife. After this, we coat the cut out contours of the doors and the already glued threads. When everything has dried, you need to carefully walk over the surface of the threads with fine sandpaper and coat it with glue again. During all coatings, we try to leave as little glue as possible so that unnecessary irregularities do not come out later. Handrails are made from thin strips of cardboard.
Now it's time to start assembling. We press down the folds on the reverse side with scissors. Then we cut it out, carefully bend it and glue it together ( Rice. 3).

Carefully sand the rough protruding cardboard in the gluing areas.
Roof. To get the roof of the desired shape, you first need to create a parallelepiped from layered cardboard, the height of which is equal to the height of the roof itself (usually painted gray). The width and length should be 1 and 2 mm greater than the width and length of the car blank, respectively (these are approximate figures). This is necessary so that after gluing the roof (by the way, it is also advisable to glue it using a press), it can be sanded on the sides and thereby adjusted to the size of the car. Next, the roof needs to be given a convex shape - to do this, draw the roof profile from the ends and cut off the excess longitudinally. After this, we sand first with coarse sandpaper, and then with fine sandpaper. After this, coat the roof with glue and wait until it dries. We process with fine sandpaper and repeat the operation. Now you can glue the roof. If you can find something to hold it down with while it dries, that will be good. If the original has stiffening ribs on the roof, they are made in a similar way using threads. We coat the junction of the roof with the body with glue. After this, air intakes can be attached to the roof. We glue cardboard at the ends of the car to hide the joint, although, depending on the situation, you can do without it. Using toothpicks, transitional soufflés are made ( Rice. 4).

Let's talk a little about the insides. First you need to make a floor from 2-3 layers of cardboard. Next, we mark on it a diagram of the partitions, which, after cutting, we “put” on glue. The total height of the interior with the floor should be selected taking into account the height of the chassis. We glue the upper shelves to the walls, but the lower ones will most likely have to be glued to the floor. After this, a strip of cardboard 1 cm wide and 2 cm long less than the length of the car is glued on top of the partitions.
Now you can paint. It is advisable to use water-indelible paints. You can use aerosol, regular oil or special model paints. Next we use tape and brushes of different sizes to obtain the desired color.
When everything is dry, we glue strips of transparent plastic on the inside of the walls of the car using double-sided tape. From the inside, we stick double-sided tape onto the roof, and then press the insides of the car to it. We again glue double-sided tape to the floor of the car from below and press the chassis to it ( Rice. 5).


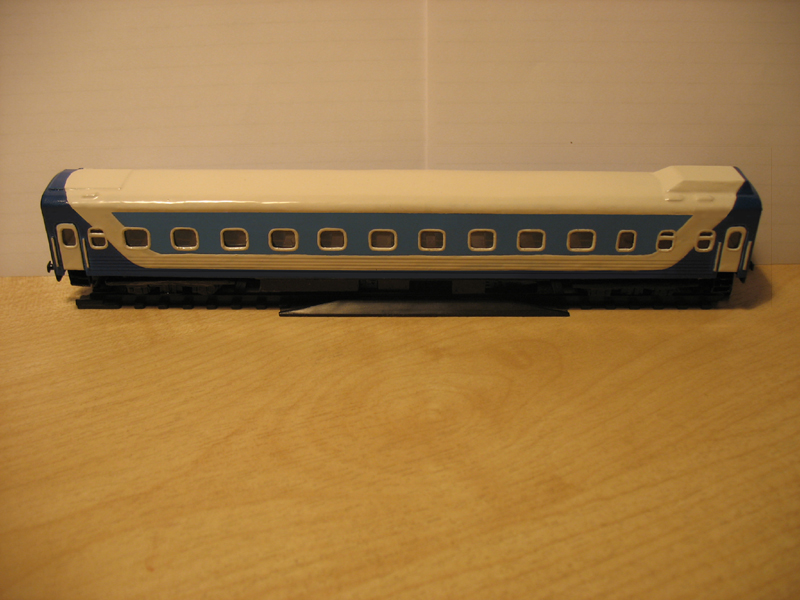
The car is ready!
Watch also the video on how to make a freight car out of cardboard:
Read also:
www.modelzd.ru
Craft Van “Ice Cream” | Country of Masters
My third-grader son was asked to make an Ice Cream van for the holidays. I had to help - I made a sample...
The work of Mary Poppins helped me get my bearings https://stranamasterov.ru/node/688112
In the technology workbook, we took the diagram of the cabin (see below), and made the body from a cube (we found the diagram of the cube on the Internet).
The edge of the cube is 6.5 cm.
I was more interested in decoration - inscriptions, voluminous headlights..., and my son - in functionality)))
He wanted to keep the wheels turning.

The son repeated all the work step by step and his van turned out no worse.
Moreover, he still made the wheels of his van spin.

I placed the juice caps on a plastic tube (you could use juice or a stick for balls) and secured them inside with plasticine.

In the workbook (Technology 3rd grade, Rogovtseva N.I.) there is a diagram of the cabin.

I hope my brief job description is useful to you.

stranamasterov.ru
Do-it-yourself “Space Rocket” craft - Vector-success.rf

The DIY “Space Rocket” craft is intended for children aged 6-8 years. You can bring the craft to class or decorate your collection of works.
Materials and tools
How to make a “Space Rocket” craft with your own hands? Step-by-step instructions for children and adults.
1. Prepare colored paper, a sheet of white cardboard, a sheet of red cardboard, glue, scissors, a ruler, a pencil, and a compass.

2. We make markings measuring 15x13 cm on white cardboard and cut out a rectangle.

3. Roll the resulting rectangle into a cylinder so that the height of the rocket is 15 cm.

4. Glue the ends of the rectangle and press firmly. The result is a cylinder - a blank for our rocket. 

5. Cut out 2 strips measuring 4x1 cm
.
6. Take a compass and draw a circle with a diameter of 3 cm on white cardboard.

7. Cut out a circle with scissors and make a cut to the center of the circle.

8. We weld the circle so that we get a cone and glue it together.

9. Cut out 2 strips of white cardboard measuring 4x1 cm and glue them to the cone on opposite sides.

10. Take yellow colored paper and cut out 3 circles - these are the windows of our rocket. Glue them in a row from top to bottom.

11. Take a sheet of red cardboard and mark a rectangle measuring 8x6 cm. The cardboard should be double-sided. Cut diagonally.

12. At the greater height of the resulting triangles, we bend 0.5 cm for gluing to the rocket body. Apply glue and glue.

13. First, glue the rocket wing on one side so that it is flush with the bottom of the rocket, and then the second wing on the opposite side.

14. The DIY “Space Rocket” craft is ready!

Kurushina Nellya Nikolaevna (a21vu_1347)
21vu.ru
1. Self-determination for educational activities. Motivate students for upcoming activities | Conversation, exercise | Leave on your desk: instruction cards, a pencil, a ruler, a glue stick, scissors, colored cardboard and paper. (check before class by the attendant). Guys, hello! Run to me, everyone. Let's stand in a circle and get to know each other. My name is Anna Alexandrovna. And what is your name? Say your name in a circle. Guys, now I know the names of all the designers of the carriage building plant. To make it easier for us to design trains, let's reset all unnecessary emotions. Guys, imagine that we went outside and beautiful snow flakes began to fall from the sky. Let's put our feet shoulder-width apart, raise our arms up through our sides, as if we were catching snowflakes, and lower our arms smoothly to the bottom. There was so much snow, what can you play with? Snowballs. To throw us a snowball, you need to bend down, take some snow, straighten up, make a snowball, swing(don’t hit each other when we throw it) and throw a snowball. There was a lot of snow, let's make some more snow. We were playing with you in the snow, and suddenly, out of nowhere, we saw a train in the distance. He was sliding down a small mountain and buzzing like “Uhhhhhh..!” But there was still a hill ahead, and it was becoming more and more difficult for him to go up the hill. Let's help the train. To do this, you need to stand up straight, and then squat down with the sound “wow!”, arms forward, straighten up. What a great fellow you are! We helped the train, it climbed the mountain and wishes you a good mood. Smile at each other. Guys, now take your seats. Have a seat. | Personal ( have motivation for educational and creative activities) Communication | 2. Updating basic knowledge and methods of action. Identifying the problem. Together with the children, formulate the topic and goals of the lesson through a problem situation. | Statement of a problem situation, conversation, explanation, demonstration | In the previous lesson with Irina Aleksandrovna, you studied the history of the railway, types of trains and cars, what cars are made of. I saw how interested you were. I have also prepared a very interesting and difficult job for you. I think you can handle it. First, let's play the game "Wheel of Fortune" (include 1 slide) The rules of the game are as follows: (rules twice) we are divided into two teams. We spin the drum. The first team answers the question given to them. The first team responded. We spin the drum and the second team answers. For each answer I give out a card with words. As a result, you should have the topic of our lesson. I will keep the score on the board. So, let's split into two teams and let's go. Which team can name the topic of our lesson. Yes. Guys, subject our lesson " Making a mock-up of a car (Tank)" Well done guys, the competitive spirit has conquered me too. Then purpose lesson we will have: learn how to make different types of tanks using different geometric bodies (cylinder, rectangle) | Regulatory(determine the most effective ways to achieve results) Communication(answer questions, draw conclusions; recognize the possibility of the existence of different points of view and the right of everyone to have their own, express their opinion and give reasons for their point of view and assessment of events) | 3. Statement of the educational task Task: Plan the lesson objectives and find the answer to them. | Conversation, explanation, example, demonstration, creating a situation of success | Guys, let's define the objectives of the lesson. What will we do in class? - Guys, do you know what a tank is? Guys, maybe you know what is a tank, and you know what they look like and what they carry. We'll talk about this today. So this will be the first task of our lesson. Guys, since this is a technology lesson. What do they do in technology lessons? (make various products) What is the topic of our lesson? (Making a model of a carriage (Tank)) So what will we make in this lesson? (tank model) And in order to make it, what do you need to put together to make a model of the tank? This is the second task of our lesson, tank layout manufacturing plan And the third task will be making a mock-up of the tank from cardboard Guys, where do we start our lesson? (find a solution to the first problem) Dima, read the first problem (what is a tank) Guys, in the previous lesson you made models of the cart, and in this lesson we will make a model of the tank. We'll have a whole lineup. But for him to go, to carry a whole train, what are we missing? (locomotive) Guys, I give you this locomotive. Now we have the driving force. What can be included in the train? (carts, refrigerator, hopper-dispenser, tanks) What will our train consist of, what do we have and what will happen? (trolleys and tanks, locomotive) The whole train can consist only of tanks, but several trolleys can also be attached to it. What is a tank anyway? Do you think the tank is a freight car or a passenger car? (cargo) If it's a freight car, it means it's carrying something. What can be transported in tanks? (liquid substances: water, oil, kerosene, gasoline, oil, acids) The tank is a special metal boiler, so it is safe to transport liquid hazardous substances in them. Guys, we have just talked about the tank, what kind of car it is, what is carried in it. What is a tank? –A tank is a freight car that transports liquid substances. Guys, we found out what a tank is. Have we solved the first problem? | Regulatory(develop the ability to plan, control and evaluate educational activities in accordance with the task and the conditions for its implementation, determine the most effective ways to achieve results;) Cognitive(complement the idea of the types of cars) Communication(master the ability to proactively collaborate with the teacher and classmates) | 5.Building an exit project Task: find solutions to assigned problems | Conversation, explanation, encouragement, exercise, creating a situation of success. | (solve the second problem) Kolya, read the second problem. (production of a tank model) To start making a tank, what do we need to put together? (plan for making a tank model) Look carefully at the tank that I made for you and, just like the locomotive, I will give it as a gift. Now we need to make a plan for how we will make a model of the tank. Guys, look carefully at the tank, what does it even look like? What shape is it? This is a cylinder. How do we make this cylinder? (twist) Can I get a ready-made form somewhere? Where in life can you find this figure? (glass, hat, rocket) Can. For example, I took a cylinder and pulled it out of toilet paper. It is strong and small, just like the truth. Now we already have a cylinder, compare it with my tank layout by color. (children's answers) How do we make this cylinder the same color? (paste) How are we going to cover it? (the cylinder itself and two side parts) We will paste it over using markings. Look, I took a larger cylinder so you can see it better. Imagine that the board is colored paper. I place the cylinder on colored paper and make markings. Let's circle. It turned out to be a circle. We need to add a centimeter to attach the side to the tank, then cut it out. To make it easier to stick, I make cuts with scissors. And we did these two times, because there are two side parts. We've glued the side parts, now let's glue it on. The cylinder itself. We take it in our hand and apply it to the edge of colored paper, make markings. I took a pencil in my hands, and mine is chalk, and marked where the length of our cylinder ends. Then take a ruler and draw a line. Cut it out. Wraps the cylinder color. Paper. We cut off the excess. Apply glue to the edge of the color. paper, wrap it and secure it with glue too. We covered the tank. – There are still a hundred at the tank. What does the tank consist of? (chassis, tank itself) The tank consists of the chassis and the tank itself, that is, all that remains is to make the chassis, which you already know how to do. Look carefully, the cart has one chassis, but here there are two. Let's make a plan. What do we do first, second... Drawing up a work plan 1. Let's mark the side parts, cut them out, and glue them. (marking, cutting, gluing) 2..Let's mark the facade of the cylinder, cut it out, and glue it. 3.Manufacturing of the chassis (2 pcs) 4. Finished product (gluing all parts of the tank) 5. (optional) You can write what exactly the tank is carrying. | Regulatory(determine the most effective ways to achieve results; use sign-symbolic means of presenting information to create models of the objects and processes being studied, solution schemes) Cognitive Communication(master the ability to proactively collaborate with the teacher) | 6.Independent organization of activities Task: consolidate new knowledge | Practical work, conversation, exercise, encouragement, creating a situation of success. | Guys, what have we done now? (completed the second task) (making the tank model itself from cardboard) Get started. If anyone needs help, please raise your hand. | Cognitive(identify the characteristics of the objects being studied based on comparison; draw analogies between the material being studied and their own experience) |
multiurok.ru
Synopsis of a lesson on technology in the 4th grade of SKOU type 8 on the topic “Practical work on making boxes from thin cardboard. Pasting a box – 4th grade – Technology – File catalog
LABOR TRAINING
Lesson #22
Subject. Practical work on making boxes from thin cardboard. Covering the box with paper.
Tasks. Teach, as directed by the teacher, to measure certain dimensions on a sheet of cardboard to make a box. Develop the ability to independently navigate a task, plan the production of a product, and exercise self-control; consolidate the ability to cut cardboard, follow the rules of safe work with tools. Cultivate accuracy and precision when performing the product.
During the classes.
1. Student organization.
2. Repetition.
When asked by the teacher, children name the properties of cardboard, show how to hold tools correctly, remember the techniques for applying markings, and the rules for safe work with cutting tools.
3. Report the topic of the lesson.
4. Organization of the workplace.
5. Task orientation.
Students look at a sample box. The teacher draws their attention to the fact that the walls of the box are connected using valves. In addition to the sample, you should also have a scan of the box, the outer walls of which are painted and differ in color from the valves. If it is folded correctly, the whole box will be the same color. The development is needed for students of the second and third groups who find it difficult to navigate the task, so that they understand the relative position of the walls and valves. The teacher asks the students of the second group to look at it, draws their attention to the color and asks them to fold the box so that it turns out to be the same color. Students in the third group are given a folded box: its walls are connected to the valves with paper clips.
The teacher points out the location of the valves, suggests removing the paper clips, unfolding the box, comparing the colors of the valves and the box, and folding it again, focusing on the color.
To independently describe the box, first a student of the second, then a third group is called.
Navigating the work conditions, students determine with what tools and devices they can complete the task.
6. Work planning according to the subject-operational plan, which should reflect the main operations: marking along a ruler, applying markings, cutting flaps (squares) along the longitudinal side of the development, folding the box, gluing the flaps;
Semi-finished products are placed in disarray by the teacher. All third-graders take part in their correct placement; the children of the second and third groups tell the plan.
7. Making a box. First, the lines of folds and cuts are marked along the ruler. The marked cardboard is lightly cut along these lines, the squares are cut along the long sides of the development; then, when folded, the valves are connected to the long walls of the box - this way the product will be stronger. The box is folded on the sides opposite to the cuts; the valves are smeared with dextrin glue or paste and glued to the inside of the walls; The glued parts are pressed with a weight.
When making a box, students' attention is drawn to the subject-operational plan as necessary. The teacher provides additional assistance to students of the second and third groups: they receive a sheet of cardboard already marked and drawn along two lines; To avoid mistakes when determining the location of the valve cut, they are asked to run their finger along the cut line, apply the finished reamer to their workpiece and put marks on the cut line with a pencil.
Before applying glue, everyone must fold the box - this is a control operation, it allows you to check the correctness of the cuts and placement of the valves. The teacher shows the children how to fasten the walls of the box using valves and helps them do it correctly.
8. Covering the box with colored paper.
Students independently measure the length and width of the sides of the box, mark the dimensions on a sheet of colored paper, cut out and paste over the box.
9. Report on the work done. Students report independently. The teacher monitors the completeness of the answer, adherence to the sequence of presentation, the correct naming of operations, tools, and indication of spatial characteristics.
10. Assessment of the quality of finished products. Students note the evenness of the application of the markings and cuts, the correct gluing of the valves, the observance of the same height of all walls, the cleanliness and accuracy of the work.
11. Summing up.
tamara57.ucoz.ru
Lesson summary on manual labor in 4th grade “Product open box made of cardboard and colored paper”
Lesson plan for manual labor in 4th grade
teacher: Ovsyannikova A.N.
Topic: “Product open box made of cardboard and colored paper”
Purpose of the lesson: to teach the technology of making a cardboard box by folding paper based on the basic “Pancake” shape
Tasks: educational (didactic):
Review information about geometric shapes and angles.
Update knowledge about cardboard and paper, folding techniques.
Correctional and developmental:
Develop logical thinking through exercises in analysis and synthesis.
Develop visual memory through memorization exercises.
Develop coherent speech while writing a work report.
Develop fine motor skills through finger exercises.
Educational:
Cultivate accuracy and diligence in work.
Cultivate interest in the lesson through the use of gaming techniques.
Materials and equipment: textbook on manual labor, colored paper and cardboard 20*20 cm, scissors, ruler
Lesson plan:
Organizing time
Lesson topic message
Introductory conversation
Task orientation
Work planning
Practical work
Progress report
Assessment of the quality of work performed
Summing up the lesson. Reflection.
During the classes:
Organizational moment
Teacher Questions: Guys, what is our lesson now?
Labor lesson
Teacher Questions: How did you know it was labor class?
Suggested student answers: On the desk there is colored paper, cardboard, and scissors.
Well done!
Lesson topic message
Teacher Questions: Today in class we need colored paper and cardboard. We will make an open box from paper and cardboard
Introductory conversation
Guys, tell us what you know about paper and cardboard, what else can they be made?
Corrective exercises
Teacher Questions: What paper folding techniques do you know?
Suggested student answers: bending a square from corner to corner, bending a rectangle in half.
Teacher Questions: What two shapes can a square be divided into if you bend it from corner to corner?
Suggested student answers: Two triangles
Task orientation
Today we will fold a box from a paper square a method of folding paper based on the basic “Pancake” shape
Work planning
Stage 1. Bend the square from corner to corner
Stage 2. Fold the left corner down.
Stage 3. Fold the right corner down.
Stage 4. Fold the top and bottom corners down. Guys, let's repeat the plan all together. What should we do first? What will we do next? What is the next stage of work? What do we do at the last stage?
We chop and chop cabbage,
(alternating movements with straight palms up and down)
We salt and salt the cabbage,
(put your fingers together into a pinch and stroke the fingertips one at a time)
We three or three cabbage,
(rub fist on fist)
We press and press cabbage.
(clench and unclench your fists)
And put it in your mouth
(put a pinch into your mouth and say: “Yum-yum!”)
Practical work (textbook pp. 111-112)
Progress report
Teacher Questions: Guys, what did we do in class today?
Teacher Questions: What material?
Teacher Questions: What geometric figure was the basis?
Teacher Questions: What was your first job?
Teacher Questions: What did you do then?
Assessment of the quality of work performed
– Now let’s look at your works and choose the most accurate one.
You tried, worked carefully, and everyone gets good grades for it.
Summing up the lesson. Reflection.
Teacher Questions: Guys, what did we learn to do in class today?
Teacher Questions: Were you interested in the lesson?
Each of you has a sun and a cloud on your desk. If you were sad during the lesson, put a cloud in front of you, and if you were in a good mood during the lesson, you were interested in working, put the sun.
The lesson is over. Thanks everyone for the good work!
2. You should have a fold in the shape of the letter X at each end of the rectangle. Now you should form each corner so that the result is a multi-layered triangle. To do this, you need to fold each of the two inner corners to the center of the letter X, bring the corners together and press them in a little.
3. For the second end of the rectangle, repeat the same steps. This should be done from the “wrong” side so that a double-sided arrow with sharp ends is ultimately formed, but these ends should be located in opposite planes to each other.
4. Bend the corners of the upper part of the “arrow” so that a diamond is formed on one edge, which is made up of two corners.
5. Bend one of the corners on the opposite side so that it connects with the bottom, and bend its edge upward. You will have a flap that needs to be bent in the opposite direction. Repeat the same action with the other corner. On this side, you will also end up with a diamond shape.
6. Place the product with the wide side facing you, lift its side parts and insert one part into the other. An arc is formed with paper valves attached to the top. The formed arc is your paper tank, at the top of which there is a real “tower”.
7. The tank is almost ready. All that remains is to add tracks and a muzzle (gun) to it. The missing parts are quite simple to make: bend the side edges of the tank and form tracks from them. To make a paper muzzle, roll up a tube and insert it into the hole in the “turret” of the tank.
Now the paper tank is done!
Also watch the video on how you can make other tanks out of paper!

If you use the knowledge on creating paper tanks from this article, then you will definitely succeed. Happy paper tank making!
"Dedicated to the crazy people"
If your desires to build a model railroad exceed the capabilities of mass production, it’s time to think about making your own models. There are different materials and technologies - here we consider manufacturing from cardboard.
First of all, you should stock up on everything you need.
First you need good white cardboard (preferably 0.35 - 0.5 mm - determined by eye using a ruler).
You also need the right tools:
- mechanical pencil with a 0.5 mm lead,
- PVA glue,
- ruler 30 cm,
- corner,
- eraser,
- threads (preferably not very fleecy),
- transparent plastic, double-sided tape,
- two types of emery (coarse and fine),
- paper knife, regular scissors,
- manicure scissors,
- clothespins (preferably plastic with flat surfaces),
- and also some other little things, which will be discussed below.
And most importantly, you need a sincere desire to make a layout!
Here we will consider the production of a model on a ready-made chassis. As a donor, you can use cars from the TT-model or VTTV.
When producing any model, reference materials are required in the form of drawings and illustrations of the modeling object. To save time, I also used the DMV from the TT model.
So, let's begin. If a drawing is used, then all dimensions must be recalculated to the appropriate scale, in my case - 1:120. Next, on a sheet of cardboard, you should draw a basic layout of the car WITHOUT a roof (the result should be an elongated parallelepiped without a floor) (Fig. 1).
On it we draw everything that should be on the walls of the car, i.e. windows, doors, lines where there should be stiffeners, etc. After everything is drawn, we cut through all the windows with a knife.
Now it is necessary to increase the rigidity of the future body - on the back side you need to glue a second layer of cardboard with already cut windows onto the walls so that the windows coincide with each other (Fig. 2).
Since cardboard has a bad tendency to swell when wet, you don’t need to spread a lot of glue, but quickly and thinly spread one side and immediately press it firmly and put it under a press.
Now let's deal with the stiffeners. They are made from threads that are glued along the drawn lines: first, an adhesive strip is applied, onto which the thread is then applied and pressed with a finger. The idea is to saturate the thread with glue and remove excess glue from the surface. Once all the ribs are glued on, it's time to outline the doors. To do this, cut a thin groove along the contour of the door with a knife. After this, we coat the cut out contours of the doors and the already glued threads. When everything has dried, you need to carefully walk over the surface of the threads with fine sandpaper and coat it with glue again. During all coatings, we try to leave as little glue as possible so that unnecessary irregularities do not come out later. Handrails are made from thin strips of cardboard.
Now it's time to start assembling. We press down the folds on the reverse side with scissors. Then we cut it out, carefully bend it and glue it together (Fig. 3).
Carefully sand the rough protruding cardboard in the gluing areas.
Roof. To get a roof of the desired shape, you first need to create a parallelepiped from layered cardboard, the height of which is equal to the height of the roof itself (usually painted gray). The width and length should be 1 and 2 mm greater than the width and length of the car blank, respectively (these are approximate figures). This is necessary so that after gluing the roof (by the way, it is also advisable to glue it using a press), it can be sanded on the sides and thereby adjusted to the size of the car. Next, the roof needs to be given a convex shape - to do this, draw the roof profile from the ends and cut off the excess longitudinally. After this, we sand first with coarse sandpaper, and then with fine sandpaper. After this, coat the roof with glue and wait until it dries. We process with fine sandpaper and repeat the operation. Now you can glue the roof. If you can find something to hold it down with while it dries, that will be good. If the original has stiffening ribs on the roof, they are made in a similar way using threads. We coat the junction of the roof with the body with glue. After this, air intakes can be attached to the roof. We glue cardboard at the ends of the car to hide the joint, although, depending on the situation, you can do without it. Using toothpicks, transitional soufflés are made (Fig. 4).
Let's talk a little about the insides. First you need to make a floor from 2-3 layers of cardboard. Next, we mark on it a diagram of the partitions, which, after cutting, we “put” on glue. The total height of the interior with the floor should be selected taking into account the height of the chassis. We glue the upper shelves to the walls, but the lower ones will most likely have to be glued to the floor. After this, a strip of cardboard 1 cm wide and 2 cm long less than the length of the car is glued on top of the partitions.
Now you can paint. It is advisable to use water-indelible paints. You can use aerosol, regular oil or special model paints. Next we use tape and brushes of different sizes to obtain the desired color.
When everything is dry, we glue strips of transparent plastic on the inside of the walls of the car using double-sided tape. From the inside, we stick double-sided tape onto the roof, and then press the insides of the car to it. We again glue double-sided tape to the floor of the car from below and press the chassis to it (Fig. 5).
The car is ready!
Watch also the video on how to make a freight car out of cardboard:
Read also:
www.modelzd.ru
If you have a large stack of paper or newspapers that you can use for good, then use them to create your biofuel. Don’t rush to throw away old documents and papers; together we will turn it all into a source of fuel that does not take up much space, and most importantly, brings significant benefits.
Let's look at the process, which is shown in the homemade video:
To create biofuel at home, you will need: - water; - a lot of newspapers or paper, the more newspapers, the better it will be for us; - a paper shredder; - several plastic or metal containers of different sizes; - a sieve for straining; - a mold to create a briquette.
Making fuel consists of a few simple steps, first of all you must shred the paper into small pieces. The shredder does this very well and quickly.
If you don't have a shredder, you can tear newspapers by hand or use scissors. Of course, the process will take much longer this way, but at least you will have something to do on your free evening.
Place the shredded paper in a large bowl and fill it with warm water. There should be as much water as can cover the entire paper.
Rub the paper with your hands to make the particles even smaller. If you have an industrial or home blender, it will grind the paper almost to a pulp. This is the paper consistency we need.
Leave the container with paper and water for 10-12 hours until it is completely soaked.
It is not necessary to use a sieve, but only if you are not afraid of getting dirty. The paper can also be squeezed out by hand.
Now metal forms are used. We put paper in one form.
The bottom of the second container must be pressed against the paper pulp to remove all remaining moisture and form a briquette.
It will be easier to remove the finished tortillas if you put cling film or a plastic bag on the bottom of the container.
The resulting semi-finished products must dry thoroughly before use. Leave them for several days in a warm place, for example, place them on a radiator.
On average, a briquette takes 3 days to dry, and they burn much longer than regular paper.
10-15 tortillas are enough to start a good fire at a picnic.
usamodelkina.ru
How to make a cup out of paper
Creating a large or small paper cup using the origami technique will not be too difficult, even if you are a beginner. Even preschool children can successfully do this. All you need to fold a glass with your own hands is an ordinary sheet of paper or a piece of newspaper, as well as a good mood and, of course, instructions. It is worth noting that a paper cup may well be the first and, without a doubt, enjoyable way to get acquainted with the origami technique. It can be assembled in just a few minutes and it won’t be easy. But, as soon as you successfully cope with such a paper figurine, study the diagram of its assembly, and other crafts in the origami style will also become within your grasp.

What is needed to create a cup using the origami technique?
You will need an A4 piece of paper, which should be cut on one side so that you end up with an equilateral square. It would be a good idea to involve your friends and acquaintances in such a creative, exciting process, because putting an origami cup together will become much more interesting. It will take about five to seven minutes to create it, but in the end you will get comfortable and very original dishes for the whole company. You can, as an option, paint the glasses with origami or sign them with the names of all the guests, then your holiday or picnic will become even more fun and funny.

Some people perceive the process of making paper crafts much better visually. Others, on the contrary, need to read everything about how to create cups from paper sheets. So, a square piece of paper or newspaper is folded diagonally. You need to make a triangle. The right and left corners are wrapped towards the center. It is important to ensure that all paper folds are not only even, but also neat. As a result, after the above manipulations, a pentagon is obtained. All that remains for you is to just bend and then fold its upper corners down. Next, you straighten the glass and can enjoy your favorite drink poured into it. It is recommended to use a standard-sized sheet of paper taken from an A4 album. However, when you need a large glass, such as a container for popcorn or berries, you can always just take a larger piece of paper to make a more capacious glass from it. Both the diagram and steps remain the same.

There are several variations of the use of a cup, which is made using the origami technique. First, you can add thread to the side of the paper product. This is done using a needle. A button is placed on the thread. Thus, the result is a game known as “sniper”. It is an analogue of the French game called "bilboke". They have one goal - to throw a button into a glass.

In Japan, with this type of game, everything is much more serious. Its participants, just like in karate, are assigned titles, that is, “dans”. This type of “sport” is called “Kendama”.
If, at the end of folding the paper cup, the triangle is not wrapped outward, but rather inward, then this creates something like a puppet theater for the fingers. Just paint the faces of different animals or cartoon characters on them, and then glue on ears or some other attributes. Alternatively, you can make your own zoo or aquarium using these cups, cheerfully decorated with fish and other representatives of the animal world.

A hole puncher will decorate your creation
If you make holes in an ordinary glass with a hole punch and cut the triangle into a semicircle, you will get a very nice product, and the shape of the semicircle, together with the uniformity of the holes, will completely transform it. These paper cups with chicken faces painted on them are very popular before Easter. Painted Easter eggs are placed in them.


