It would seem that it could be simpler than paper and cardboard crafts! This type of creativity is familiar to every child from an early age, and the kindergarten teacher talked a lot about various ways to create paintings, appliqués and figures from these simple materials. At school, a child can be shown paper creativity from a different perspective: they can be shown that crafts do not have to be primitive at all, they can have a functional meaning and bring aesthetic pleasure from the work done.
Technology: paper and cardboard crafts
An important component of school discipline in primary school technology - paper and cardboard crafts. This activity, like other types of creative activity for younger schoolchildren, is extremely important for the comprehensive development of the child. At the beginning of each lesson, where the children will be asked to work with their hands and create paper flowers, figurines and other crafts, the teacher should interest the students in this process.
If we are talking about creating a certain type of flowers, then you should say a few words about this plant, give an example of where it grows and where children could see it. Often used in technology lessons is a presentation with a visual demonstration of not only the introductory part of the lesson, but also step-by-step master classes. Thanks to visualization, schoolchildren better assimilate the material covered, and a presentation with a master class will attract their attention and arouse interest.
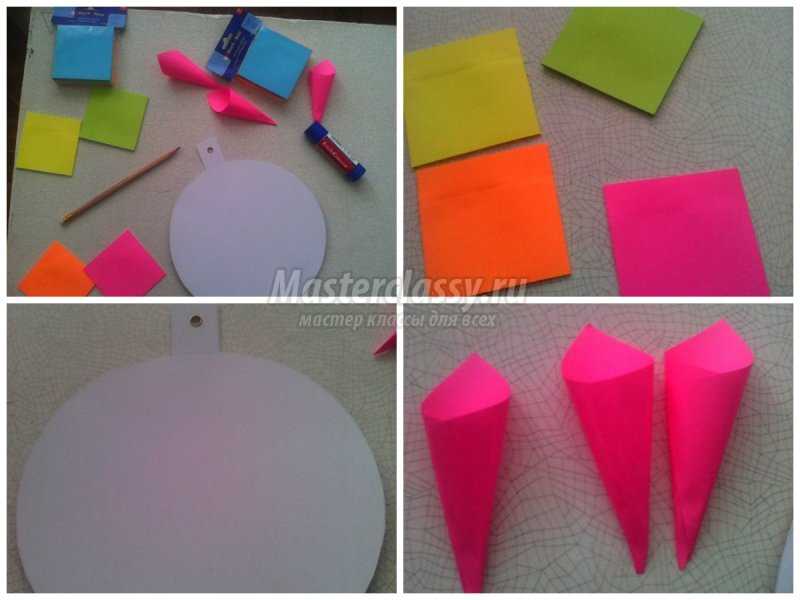
Dahlias - a simple option crafts made from colored paper and cardboard. A paper dahlia can be used to decorate a classroom if made large. The main thing is that the same master class allows you to make a small or huge flower, using the simplest and most affordable materials.
The dahlia consists of many sharp-angled paper tubes, which are glued to a cardboard base in layers. A large flower looks very impressive from a distance, so it can be glued to the walls on the eve of a school holiday or spring ball, but it is also impossible to take your eyes off it when looking at it up close.
If you decide to make such voluminous flowers that can become an element of decoration for a homemade card or floral applique, without the help of a hole punch, then you will need a simple pencil and scissors. The task will not be easy: each circle must first be drawn on paper (you can use a small marker as a template), and then cut out one by one.
Cardboard circle
Colored scrap paper
The flowers turn out to be very beautiful if you use colored embossed scrap sheets for your work, but ordinary bright colored paper will do, but it must be colored on both sides.
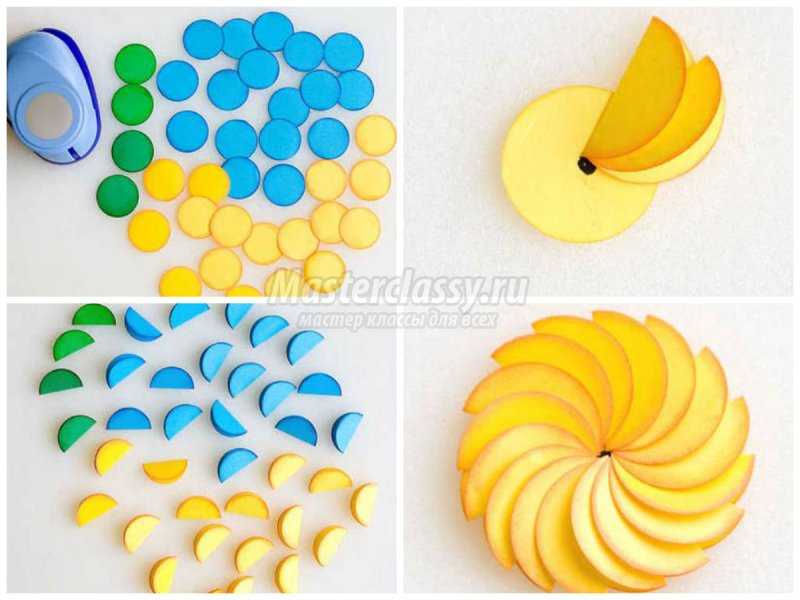
We only need cardboard to cut out the base circle; it should be the same diameter as the rest of the circles. All prepared paper circles must be carefully folded in half diagonally. During the lesson, children will also be able to acquire first knowledge about geometric shapes and geometric terms. In the presentation, they should be told and shown on a slide what the diameter of a circle is. When all the blanks are ready, you can start creating the flower.
On the cardboard base, you need to mark the middle - put a dot with a marker, and then start gluing the blanks. One edge of the workpiece should touch the middle. Each piece should be glued so that the half is glued to the base, and the second half remains free; it will create the volume of our flower. The next piece must be glued so that it is nested into the previous one. The result is a voluminous flower, beautiful and original, and you can decorate the middle with a bead, rhinestone or a drop of glitter.
A blooming bud can be made using the same half blanks. For such a bud you will need only four circles for the petals and another green cardboard circle. The cardboard circle should be folded in half, and four blanks should be glued into it, as demonstrated in the master class. You can glue the blank petals in two rows, in this case it is better to use circles of different sizes: small for the first row, large for the second.
If you plan to make, for example, cards for Easter or March 8, then you can decorate greeting cards with such flowers.

Crafts made from paper and cardboard, grade 3
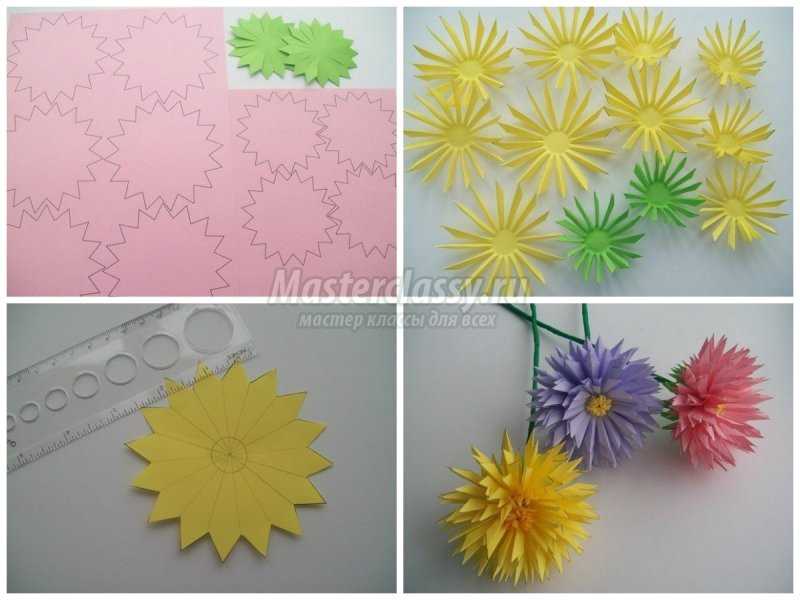
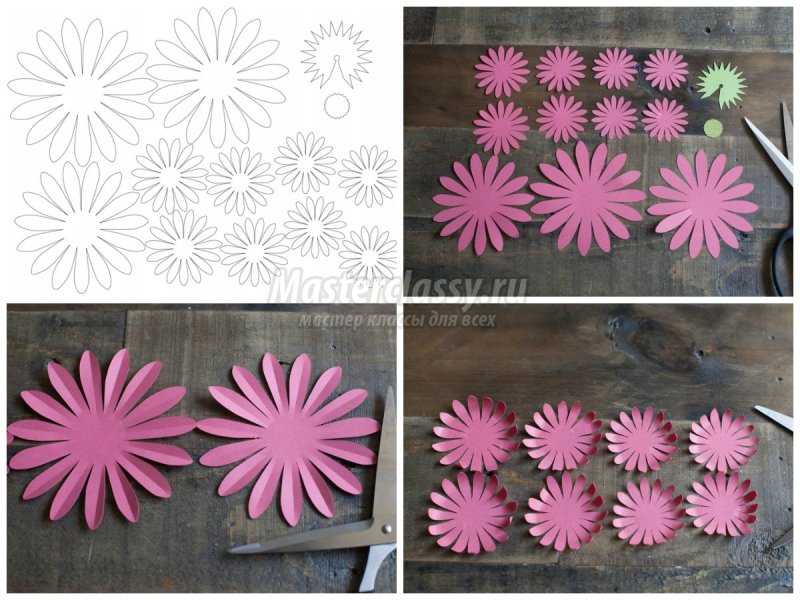
In some cases, when it comes to paper and cardboard crafts, templates may be needed. Typically, templates are used when there is a need to cut out many openwork parts of the same shape or size. For example, when making multilayer gerbera flowers, you need blanks with petals, and to make the craft as neat as possible, you can download a template of the desired shape, print it on a sheet, and then cut it along the contour with scissors.
You can also redraw the template onto a sheet of paper, attach it to the monitor and trace along the outline with a soft pencil, then transfer the template onto cardboard and cut it out. You will have a cardboard blank ready, which can be traced on colored paper, obtaining petals of the required shape.
At first glance, it seems that the cutting technique is very simple, and schoolchildren have long known how to create crafts made from paper and cardboard. 3rd grade You can teach not just cutting and gluing techniques, but also open up a fundamentally new way of working with long-known materials and tools. Schoolchildren can appreciate that the results are not primitive at all, but can look like a work of art. You can further interest children in paper crafts if you tell them about this modern super-toy.
Paper and cardboard crafts for children
We will make bright, colorful gerberas - this paper and cardboard crafts for children and for adults who are able to discover a fundamentally new technique for working with those materials that everyone has known since kindergarten. Looking at the list of materials needed for the work, you will see for yourself:
Colored thick paper
Glue gun
This is the entire basic set that will allow us to make a paper work of art. The proposed master class also used floral tape and wire, as well as wire cutters, but these materials can be called auxiliary, since they were used at the stage of forming bouquets of ready-made flowers.
Pay attention to the template: it contains 11 flowers, among them 3 large and another 8 smaller, while the small templates are not all the same size, among them are four larger and four smaller. This way you can create a beautiful multi-layered gerbera. The petal template should be printed on bright paper, the color you chose for the gerbera. Two more small details should be printed on a green sheet - these will be the details of the sepals and the center.
In modern schools and preschool institutions, much attention is paid to working with paper. Both toddlers and schoolchildren love to create original paper crafts. Working with it, the child develops his imagination, learns to think creatively, and also develops fine motor skills of his fingers.
You can make simple voluminous gift boxes or voluminous numbers with your own hands by drawing a diagram on a piece of paper. Many crafts are almost impossible to put together without diagrams. Thanks to the templates, you can create complex three-dimensional fakes from colored paper or cardboard. Beautiful trinkets, furniture models and much more - any lover of creativity can do it.

To do this, you need to find any template you like on the Internet, for example on the Country of Masters website. Animals, birds, toys - everything can be created using ready-made templates and diagrams.
Each template comes with instructions on how to assemble the craft. You need to download the template, print it on a printer, and cut out a figure along the contour. On each figure, dotted lines will be drawn on the template along which the model should be bent. Glue the finished model with glue.
Easy paper crafts for kids
Children show interest in paper from childhood. To instill a love of creativity, parents should engage their child in creating a variety of paper crafts. You can make a beautiful, bright bird craft that your child can play with or use for bedroom decor.
A simple cardboard bird:
- Using the template, cut out the shape of a bird, draw the beak, feathers, and tail.
- Fold an accordion out of a square sheet of colored paper.
- Make a hole and secure the wings in it.

If you cut out several birds, you can create a Chinese breeze according to Feng Shui. By hanging the birds on a wooden stick, you can use this craft to steal the entrance to a child’s room.
All cutting work must be carried out by adults or under their close supervision!
After working with paper, the child must put the entire tool in a box. This is how accuracy is developed.
Stylish crafts made from cardboard and paper: three-dimensional paintings
The simplest paper craft is considered to be appliqué; it is often studied in elementary school. A beautiful three-dimensional painting of bright flowers will be an original gift from a child to his mother or grandmother. Flowers can be made from white toilet paper or napkins.
If you use toilet paper for crafts, it is better to use expensive white paper with perforations, which you can then lightly paint over.
Working with napkins is very simple, but you need to be careful not to accidentally tear it. Therefore, you should be especially careful when creating such crafts.

Progress:
- Fold the napkin in four and fasten it with a stapler in the middle. Cut a circle from a napkin
- Lift each layer of the napkin in turn, forming a lush flower.
- Cut out 6-7 leaves from green paper according to the template.
- Cut a basket out of brown paper and stick it on a thick red sheet of cardboard. Place flowers and leaves in a basket.
The basket can be made from corrugated paper of any color, but it is advisable to glue it in a couple of layers. Instead of paper, you can use baking foil or chocolate.
Interesting paper crafts: weaving
There are a lot of ways to weave paper crafts; this is a very interesting and original way of creating crafts.
The simplest thing is to weave strips of paper together in a checkerboard pattern, creating an object. A more complex method is weaving from paper rolled into tubes.
Depending on what paper you choose, your craft will have special properties.

There are several options:
- Newspaper;
- Glossy magazine;
- Tape for cash registers;
- Plain paper.
Note that it is easier to work with paper, which is durable - the craft will accordingly be more durable. An original drawing will come out of glossy magazines.
You should not intertwine different types of papers together. Thick paper may not intertwine with thin paper, and sometimes can tear it.
Finished products can be decorated with ribbons, beads, quilling flowers, whatever your imagination can do.
How to make a paper craft: preparing paper tubes
Weaving paper tubes is a very interesting creativity. You can make tubes from magazine sheets - the material is quite dense and bright pictures will become an original design on the basket.
To make it you will need:
- Paper;
- Scissors;
- Pencil;
- Ruler;
- Glue;
- Knitting needles.

First, let's prepare the tubes. We simply wind ribbons 90 mm wide of any length onto a knitting needle. We glue the edge, take out the knitting needle, leaving a couple of centimeters inside the tube, and glue the second edge.
It is advisable to wind it tightly, the accuracy of the product depends on this. You should not be distracted by extraneous matters, as this will cause the progress of your work to be lost.
By gradually pulling out the knitting needle and extending the paper onto it, you can lengthen your tube to the desired size. To weave a basket, the length of the tube should be such that it is convenient for you to bend it.
Beautiful basket: paper crafts step by step
So, we have made the blanks, in addition to this you will need a piece of durable cardboard, scissors and glue. You need to cut out the bottom of the future basket from cardboard. To do this, we cut out two cardboard circles using any template.
Now you can start weaving the basket:
- On the first cardboard circle we glue paper tubes around the circumference. Glue the second circle onto the tubes.
- We lift the tubes up and fasten them with an elastic band.
- Glue the end of one tube to the base, then grab the standing tube from the outside, lead it inside and grab the second tube from the inside.
- We alternate “outside-inside” until the tube runs out.
- To lengthen the tube, you need to insert a new vine at the end of the previous one.
- In order for the basket to have a certain shape, when weaving it is better to insert a bottle or jar inside.
- We weave all rows to the required height.
- If there is a piece of vine left, do not cut it, it is better to fix it inside the finished basket. To be sure, you can glue it to one of the tubes.
- Frame tubes can be glued to the walls of the basket.
- We paint the finished product with acrylic paint, wait for it to dry completely and paint it again.
42.jpg)
The decorative basket is ready, you can put a small artificial flower there or adapt it for hairpins and elastic bands.
Simple paper crafts: angel for Christmas tree
For the New Year, I really want to decorate my house with beautiful decor. The easiest way is to make beautiful paper crafts yourself with a little effort. Even a 4-5 year old child can make this angel craft under the supervision of their parents.
How to make a Christmas angel step by step:
- Cut out two 10x10 cm squares from colored paper. Fold them like an accordion.
- Make a bend on the accordions, stepping back 3 cm from the end. Bend one accordion to the right, the second to the left.
- Glue the folded fold to the bottom of the fan.
- To make the head, you need to cut 4-5 strips of paper the width of the edge of the fan. We wind the strips on top of each other, forming a tight circle. Fix the size of the head with glue.
- Direct the remaining piece of paper down.
- Glue the halves together. The angel is ready.
17.jpg)
If you want to decorate your Christmas tree with an angel, you can tie a serpentine to the halo and hang the craft on a branch.
You can also plant it on the top of the Christmas tree. To keep it in place, simply attach the craft to the branch with a regular clothespin.
White paper crafts: 3D snowflake
Volumetric snowflakes look impressive, and they can also be used to decorate your apartment before the holiday and decorate the Christmas tree. To create such a craft you will need paper, scissors, and glue.
How to make a volumetric snowflake step by step:
- Cut 6 squares from sheets of paper.
- Fold the square in half to form a triangle. Make cuts from the bottom fold towards the top corner. The cuts should not meet, you need to leave a small gap between them. Thus, make 3 triangular cuts.
- Unfold the piece of paper and place it in front of you in the shape of a diamond.
- Fold the first inner row of strips together and secure with glue.
- Turn the craft over and repeat step 4 with the next stripes.
- Turn over and fasten all remaining strips.
- Use a similar method to make 6 parts of a snowflake.
- Fasten 3 parts together with a stapler.
- Glue the two finished halves together.
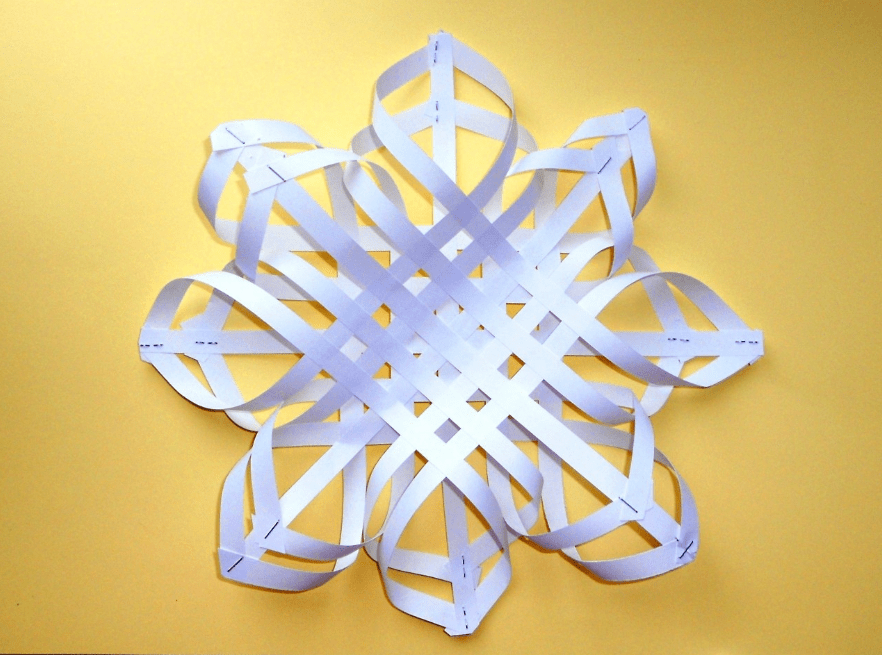
When working, it is better to use glue with a brush or a glue stick.
If you place a ribbon loop in the center when gluing, the finished craft can be hung anywhere.
White and colored paper is suitable for work. A snowflake made of paper will look very unusual, where one side is colored and the other is white.
The simplest children's paper crafts without scissors
An easy and beautiful craft for kids – “The Universe Through the Eyes of a Child.” The picture can depict the month, stars and other celestial bodies. This craft can be made without cutting.
To work, you will need very few materials - glue, confetti (or small pieces of torn paper) and a dark blue sheet of cardboard.
How to do:
- Collect confetti from firecrackers or use a hole punch to cut out a bunch of small circles from multi-colored paper.
- Take a stencil and apply a design on a sheet of paper - a crescent moon, stars and planets.
- Paint over the drawn figures with PVA and while it is still wet, sprinkle with ready-made confetti.
The finished picture can be decorated with a shiny frame; for it you need to finely cut the New Year's rain and stick it along the contour of the picture in the same way.
7.jpg)
You can work with such a craft even with preschool children - in kindergartens or early development clubs.
This method can also be used to decorate appliqués. By decorating, for example, a Christmas tree cut out of a green leaf, you can make a beautiful New Year’s craft.
Fascinating paper crafts for children: moving toys
Such toys are very interesting for children. You pull a string, and the animal or doll’s arms and legs move. In fact, making such a figurine is quite easy.
An entertaining puppet toy can also be made from plywood, but since cardboard is more flexible to make, we’ll better analyze this option.
To work you will need cardboard, a couple of buttons, thin wire, scissors, strong thread and bards.

How to make a dog puppet:
- We draw moving parts (paws and tail) separately on cardboard and cut them out.
- Subsequently, at these points we make fastenings using wire or bard nails. Buttons can be used as a stopper.
- We glue the body and head with tape or glue to a bamboo stick.
- We insert the fasteners into the pre-made holes in the paws and align them with the body. We tie the paws together using thread or elastic. To do this, we make two additional holes in each foot so that they are located as close as possible to each other, and the thread is not visible from the front side.
- We attach the tail in the same way and connect it to the hind leg.
- Then we tie another long thread to the one between the legs, it will set all moving limbs in motion.
- The final stage is painting, at your discretion.
By making a cat, fox, or hare using a similar technology, you can arrange a puppet theater for kids. Every child will enjoy a performance based on their favorite fairy tale with the participation of animals.
Paper crafts without glue: simple origami for children
The origami technique is quite complex, but you really want to make an interesting three-dimensional toy for your child with your own hands.
This chicken is one of the most interesting and relatively simple crafts. The sheet of paper should be square.
Tip: if you want to avoid severely torn edges when tearing off, bend the sheet in both directions.
For cutting, you can use scissors or a ruler with a sharp utility knife.
Origami chicken step by step:
- Fold the square sheet diagonally. Unfold and fold in half.
- Having unfolded it, we bend the left and right corners of the square inward, combining them in the middle of the square. The result is a pentagon.
- We bend the top of the cone into the middle. Then we bend the same cone in the opposite direction so that a small corner protrudes beyond the border of the sheet - the future beak.
- We combine the left and right sides of the entire craft, placing it so that the beak is on the left.
- We bend the upper right corner into the middle of the product.
- The lower right corner, it consists of two sheets, we bend them outwards of the product. We do this by combining the lower sides, and at the same time we bring a small corner beyond the extreme left border - these are the legs of the chicken.
- We turn the small tail corner outward.
- We lower the beak down a little. You can paint over it with a regular red pencil for more realism. Draw the eyes.
With such a craft you can surprise a child and intrigue him. Having aroused interest in the toy, you can attract your child to help create similar origami next time.
Master class: DIY paper crafts (video)
In fact, you can make so many crafts from paper and cardboard that you can’t even list them – animals, birds, cars, dolls. They can be voluminous or simple, colored or white. The richer your imagination, the more interesting the craft will be.
Applications for children are one of the most favorite games and fun. But it’s by playing that the little ones learn! They gradually become accustomed to the world of colors and shapes. And they also get satisfaction from the fact that they themselves, with their own hands, can create beauty. And if parents want to help their child, we will give you ideas for appliqué made from colored paper.
What we can offer:
- Schemes and stencils for applications of different figures: flowers, animals, insects and fairy-tale characters.
- We'll show you what interesting, non-traditional appliqué techniques there are.
- And, of course, we will give you a lot of positive emotions! We are sure you will have fun with us!
For the little ones
Who said that plot application is difficult? Even the younger group can cope with some types of applications. Now we will create a beautiful basket with flowers in it.
What we may need for the application:
- Colored thin paper;
- Cardboard;
- Pencil;
- Stencils;
- Glue.

Hedgehog
Applications for the little ones are creativity, where the abilities of even the tiniest fidget are taken into account. And this example with the “hedgehog” is just right for toddlers who, by the age of three, still cannot cut and glue, but they will be great at participating in the work. How?

Volumetric ladybug
This application is perfect for children 3-4 years old. It is very easy to make.
Application execution sequence: 
Flower meadow
This clearing is an application for the younger group for children 4 years old. It can be any size and color. And several kids can work on it together at the same time. It is only important for each of them to indicate his area of work.
Lesson in 3 stages: 
Little funny chicken
You can prepare holiday cards in a very original way. The application in the preparatory group will help with this.
You need to cut out the following parts: 
Chick
Kids think abstractly; for them, such a trifle as the color or shape of a character does not matter if his image conveys child-like emotions. But how can you make an applique just like this so that your baby feels a kindred spirit? Here's a great example of this!
Meet Tsypa! Him:
- Body - square;
- Eye – 2 circles (black and white, and a little more white);
- Beak - triangle;
- The paws are also triangular;
- The wing is a semicircle;
- Tuft - crescent.

Now, trust the little one, let him choose what color will be! Explain what each figure means and why the bird needs it. Isn't that interesting? So, finding the right stencils for applications is already a game. All that remains is to glue everything together!

Sun
Let's complicate the task. We have to help the children learn how to make an applique panel. There are many details that are both a background and an independent part of the picture. The central part is the mischievous face of the smiling Sun.
Leave the work on your kitten's smile. Or you can print ready-made faces:


And start preparing yellow, golden and orange circles of different sizes.


We assemble a picture on a blue background.

You can stick circles in the form of rays, or in a circle, the main thing is to alternate their colors. The Sun itself will be placed in the middle of the panel.


Lilac
Probably, a broken applique is the sweetest and most tender thing you can imagine. She just looks so fluffy that I can’t believe it was all created. A torn applique achieves this effect due to small uneven parts assembled into one composition.

Bouquet
These are not just flowers, but a structure that will stand. In this case, we will make all parts of the plant. The flowers themselves, leaves and stems. Children in the middle group will master this simple applique very quickly.

Snowman
We made greeting cards, invitations to celebrations, paintings, and even memories of your little one’s childhood. But now we will try to make a Christmas tree toy.
And since it consists of two bases and 16 circles, we print out templates for applications, this will allow you to quickly, and without delaying the preparatory work, move on to constructing the toy.
Read more about blanks. The basis is 2 circles of the same size, drawn as a figure eight. The additional circles are equal in diameter to those in the base.
We also need a rope 4 times the length of the base. And decorative beads. 
Glade
Polyana is a multi-composition application in kindergarten for children 5-6 years old. Here we will get acquainted with models that need to be made first, and only then fixed to the base. Volumetric types of applications are made with such an original sample.
Our base is blue cardboard. This is heaven. The sun is shining. The grass grows and flowers bloom in it. And butterflies and dragonflies flutter above them. All parts are made of accordion-folded paper. 
A collection of applique master classes + interesting ideas


It's nice to know that different types of appliques made by children, such as appliqué made from torn paper or from corrugated material, are a good memory. And irrefutable evidence that our little ones have talent. The child is developing. And we help him with this.


Often at school and in kindergarten they give tasks to children, read - to parents, to make crafts on a specified topic, usually for the fall holiday, federal holidays, such as New Year, etc. And here begins the dance of fantasy and the competition of skillful parental hands, we try to remember what we ourselves did in childhood.
But you want the child to also participate in the process and receive pleasure and satisfaction from it. Still, everyone needs creativity. That’s why today I picked up a few fairly simple crafts that you wouldn’t be ashamed to use at a school or kindergarten exhibition. And the baby will be able to repeat this himself, under your strict guidance.
Have you ever cut out snowflakes by folding a piece of paper several times and then cutting out circles and triangles? Most likely yes, and they probably compared later which one turned out more beautiful and more delicate. So the craft that I want to invite you to make is created using this technique.
This basket is suitable for kindergarten and for keeping a small child occupied.
And today we will make a basket.

We need two blanks, as in the photo. I will give you a template, but you can make them yourself; I will also describe the process below.

1.To make them yourself, you need to take a piece of paper and make a 16*16 cm square out of it.

2. And roll towards the middle 4 times.

3. Remember how you made snowflakes as a child. Now we cut off a part from the edge in a semicircle.

It turned out to be a flower.

From each edge between the petals you need to trim a little so that the petals can curl.
4. We also prepare the leaf. Make the leaf square.

We do not cut off a semicircle, but first we need to make a long pestle.
Let's expand.

5. You need a strip of 30*2 cm, glue the handle of the basket.

We decorate it with multi-colored flowers, circles, beads or beads.

We bend the edges of the green leaf.

And glue the basket to the leaf.

You can use this template.

Of course, if the child is small, then you will have to make the blank yourself, but let the baby decorate the basket. He should enjoy this activity.
How to make a watch quickly and easily
And many more can remember how, carried away by the game, they remembered about the craft only for the coming sleep. There is simply no time to stretch out the process: the child has to go to school, and you have to go to work. We need to create something fast, cute and big.
Here is the next version of paper crafts just for this case. It's called "Clock". Depending on the chosen color and decor, this could be a New Year's watch, an autumn holiday, a decoration for a birthday, etc. You can continue the list yourself.

We will need:
- 4 sheets of A4 colored paper
- 4 circles with numbers
- Scissors
- Strip 20-30 cm long
- A piece of black construction paper

The basis for the clock is a fan made from sheets folded into an accordion. Let's start making them.
1. We begin to make an accordion; to do this, we fold the sheet in half along the long side.

2. Now fold the fold line to the edge again and repeat again.

3. Unfold and fold the edge in half towards the first fold.

4. And we continue to bend the sheet of paper in this way until we get a smooth, beautiful accordion.
We also fold the remaining 3 sheets.

5. Fold each corrugation in half and find the middle.

6. Now we make a fan, to do this we coat the edge with glue and glue both parts.

This is what the preparation should look like. We form the remaining fans.

7. Now we assemble the clock, for this we glue the fans together.

8. Cut out arrows from black paper.

9. And glue them to the clock.

10. Cover the junction with decor, a circle, a snowflake.

11. Glue the numbers.
12. Glue a strip to hang the clock.

That's all the work!
We make DIY crafts step by step for children from 9 to 11 years old
For older children, nine or eleven years old, I can offer an option for a simple, beautiful craft. But it requires care and accuracy. This is a beautiful ball of paper. You can also decorate a room with it, or you can take it to school for a holiday, or use it to make fruits or vegetables from your homework. And it looks very beautiful and unusual.

By the way, it is done without the use of glue, stapler, or tape. All you need is paper and scissors.
We make blanks as in the photo, you need to make 12 of them.

We cut out the blanks. You can make them yourself, so there is no special template.
To draw them beautifully, I suggest first drawing a pentagon with equal sides, and then using a compass to draw a semicircle with a diameter equal to the width of the side to each side. I hope I explained it clearly. In other words, the pitch of the compass leg will be the same as the width of the side.
Cut straight lines and bend them a little. Now we insert the blanks into each other.

Here is a photo of what the ball looks like in the process.

This is a fairly simple craft, but it requires dexterity and accuracy, so it will be just right for children 9-11 years old. A small child may not be able to cope with this task or may tear the workpiece.

By the way, you can take thicker paper, so the ball will turn out denser.
Corrugated paper cone
Flowers and candy bouquets are usually made from corrugated paper, but we will make a cone. Because boys like to make flowers more, but all children, regardless of gender, can make a spruce branch with cones.

We will need:
- Corrugated paper: brown and blue (green)
- Scissors
- Thread
1. Take a brown roll and cut off one edge without unpacking.

2. Cut the fold to make two strips.
3. Bend the edge 1 cm along the entire length.

4. Now we wrap the tucks along this edge, as in the photo.

5. We begin to roll this ribbon into a cone, leaving only the openwork edge on top.

6. The end of the cone can be tied with a rope, then we wrap it with a strip of blue or green corrugated paper.

7. Now we make twigs from the green strip. We cut the edge wider than the middle.

8. And we roll these strips into pine needles and twist them lengthwise, like a cone.

And here is a detailed video on how to make a bump.
Cardboard crafts for kids 5-6 years old
Well, what to do with small children? After all, they are interested in it in most cases. I offer two simple crafts. Not everyone still knows how to cut exactly along the lines, but they should still like the result. We will make a three-dimensional tree from cardboard and paper and a simple dog using the origami technique.
Cardboard tree
We will need:
- sheets of paper,
- cardboard,
- pen,
- glue,
- scissors.

1.Two A4 sheets need to be folded together and folded in half vertically.

2. And draw a tree so that part of the trunk is on the bend. Cut out the workpiece.
3. Fold the tree in half to determine its middle.

4. Now we separate the sheets and get 2 blanks.

We also find the middle of the second tree.
5. Now we retreat 3 mm from the fold for the first workpiece from the bottom to half, and for the second from the top to half.

6. You get two such halves of one tree.

7. Now we transfer these patterns onto cardboard and cut out the trunk.

8. You need to cut out leaves of different sizes from colored paper and glue them to the branches.

Now the tree needs to be assembled by inserting cardboard blanks into the grooves of each other.
You can make flowers or juicy fruits and berries.
Paper craft for kids “Dog”
The entire craft is created from just one piece of paper and is done quickly, the child will not have time to get tired. But diligence must be at the highest level in order to get everything right.

White leaf 10*10 cm.

Fold the leaf diagonally. This will be the head of our dog. Then we fold it again, so we determine the middle.
We wrap the edges, form ears, we do this in any order, but so that the tip extends beyond the sheet.

Now we are making a muzzle; for this we bend the bottom corner a little.

Let's cut out two small circles in advance and draw black pupils in them, these will be the eyes. Cut out a pink tongue and a black nose. And glue it all to the muzzle.

Did your children like the dog?
Paper leaves for school: 4th grade on the theme of autumn
Autumn is usually represented by either colorful leaves or an abundance of fruits and vegetables. We will also recreate it in the form of leaves. But they will be quite labor-intensive, but very beautiful.
Craft “Autumn leaf”

We will need:
- Need 5 squares 15*15 cm
- Rectangle 15*5 cm
- Double sided tape
- Scissors
- Stapler
1. Find the diagonal of the square by folding it in half, and then in half again.

2. We make 3 cuts on this triangle, leaving 3 mm from the fold.

We open the workpiece.

3. We begin to glue the corners into a tube. The first layer is to make the middle, using double-sided tape.

4. Turn over and glue the next corners.

5. And glue the remaining two corners, but alternately turning the leaf over.

This is the part of the leaf you will get. We make 4 more such leaves.
6. For the stem, simply twist a tube from a paper rectangle.

We connect the leaves with the stem, securing them with a stapler.

Watch the video on how to make these leaves.
Craft “Wreath of autumn leaves”
And here we will create a whole composition of autumn leaves, it looks very elegant and self-sufficient!

We need 10 squares 8*8 cm. Choose the color of the paper to match the colors of autumn.

Let's start making a yellow leaf.
1.Fold it in half, then fold each side into another half. You will get two large triangles.

2. Turn the leaf over and fold the remaining part to get two small triangles. As shown in the photo. We make 6 such blanks.

3. Now fold the next leaf in half again.

4. We wrap the two edges to make two large triangles and leave them.

5. Now we collect the leaf. We take the first two blanks and one with large triangles, coat the edges and glue it inside the first two blanks, as in the photo. It's like we'll put it inside.

6. Now you need to make a twig. To do this, turn the leaf over to the front side and place another leaf under it.

Glue it.

7. Turn it over to the wrong side and trim the leaf for the branch along the edges of the future leaf. This is necessary so that everything looks neat.

8. Now we wrap the cut edges inward and glue them.

We need at least 8 of these leaves.

Lay out a circle and glue them on top of each other to create a rounded shape for the wreath.

All leaves need to be connected to each other.
Schemes and templates
Most often, it is kids who make crafts, so I want to give here a few templates and diagrams that can be used in joint creativity.

For example, simply trace, attach a blank sheet of paper to the computer, cut out and let your child decorate.

Or suggest gluing butterflies to a piece of paper, but this is more related to appliqués.

Or make a wreath from such leaves.

Patterns of animals and trees.

Or tell your child that the bell is blue, cut it out and color it.

These are the crafts I prepared today to complete your homework or decorate your apartment for the holiday.
The most common material for creating simple crafts is colored paper. Indeed, working with paper is not only easy, but also fun. Working with paper is also an excellent exercise for little ones' fingers. Considering all these advantages of paper, we decided to offer you crafts made from colored paper for kids. Here you can see the brightest ideas and try to have fun with your child.
Craft ideas made from colored paper
Chamomile.
Today there are a huge number of paper crafts for children. But we hasten to offer you only the best ideas. For example, all children love the daisy flower. Therefore, they will be happy to do it. To create a flower you will need:

- multi-colored paper and a sheet of cardboard,
- PVA glue and scissors.
Progress:
- Long strips are cut from sheets of white paper. To ensure that the stripes are even, lines are first drawn on a sheet of paper with a pencil and a ruler.
- After that, circles are cut out of yellow paper, which will be the middle of the chamomile.
- It is also worth cutting out 3 long strips of green paper and several leaves.
- You need to make petals from white stripes. White strips are glued together on both sides to create loops.
- Then all the elements are glued to the cardboard. (Please note the photo).

Paper goldfish.
All crafts made from colored paper that we list in this article are suitable for children 4-5 years old. To make a fish you should take:
- a sheet of thick cardboard and a round plate,
- ruler and scissors,
- colored paper and PVA glue,
- a simple pencil and elements for decorating the fish.
Progress:
- First we cut out the fish figurine. To do this, take a plastic plate, place it on cardboard and the child traces its contours. After which the resulting circle is cut out.
- Using a pencil, draw straight lines to the edges of the plate. In this case, you need to use a ruler so that a triangle is formed. Now the baby must cut out this triangle.
- The piece that was recently cut will be the tail of the fish. It is glued to the back of the cardboard circle.
- Now you need to draw an eye or cut it out of colored paper.
- That's it, the simple craft is ready. You can simply admire it or use it in children's games.

Original butterfly made from children's hands.
Very entertaining applications can be made from the contours of children's palms. In addition, such an activity can please your child and give him a lot of positive emotions.
On a note! Save this craft so that you can remember the size of your child’s hands in the future.
To make a craft, take:
- Colored paper and scissors,
- White sheets and glue stick,
- Elements for decoration.
Progress:
- The baby must first place his left palm and then his right palm on the sheets of paper. Using a pencil, an adult traces the contours of the palm. As a result, it is worth making 4 palms of different colors. They will be the wings of a butterfly.
- The palms are now glued onto a sheet of white cardboard. (Please note the photo).
- After which an oval is drawn on a colored sheet. It must become the body of a butterfly. The child must glue it between the wings and palms.
- Now you need to draw eyes and a smile with felt-tip pens.
- You can use completely different elements to decorate the wings. It could be sparkles or sequins. You can also apply ready-made stickers.

Beautiful paper applique.
In this article you can find simple crafts for kids made from colored paper. These items will be fun and easy to make. Invite your child to make an applique from colored paper. Surely he will enjoy this activity. To create an application you will need to prepare:
- a sheet of thick cardboard and a simple pencil,
- scissors and glue, colored paper.
Progress:

Heart "With love".
Crafts made from colored paper for kids must be bright. In this case, the process of creating them will definitely interest the child. To make the following craft you need to take:
- A thick sheet of cardboard and PVA glue,
- Corrugated paper of different colors and scissors.
Progress:
- Draw an even heart on a piece of cardboard. It should have a size of 20x20 cm. Cut out this heart.
- Colored corrugated paper is cut into 2x2 cm squares.
- These squares are glued as follows. A small area of the heart is coated with glue and a square is glued to it. Using a toothpick, the edges of this square are raised.
- This way you need to fill the entire space of the heart.

Cute caterpillar.
To make it fun and interesting for children to make crafts of various kinds, be sure to offer them only bright colored paper to work with.
To make a caterpillar, take: colored paper and glue.
Making a caterpillar is incredibly easy. The base cardboard is being prepared. Circles are cut from sheets of colored paper. Moreover, the circles should be of different sizes. The largest circle is the head. The circle of smaller diameter is the tail. Glue all the parts onto cardboard.
On a large circle, use a black felt-tip pen to draw facial features and make hairs with horns from black paper. 
Ladybug.
Here we offer you simple crafts made from colored paper. Making a ladybug is very simple. Take cardboard and glue for this.
Progress:
- A circle is cut out of red cardboard. Circles and stripes are glued onto it.
- The legs and head are cut out separately from black cardboard. All these elements are glued to the red circle on the inside.
- Now all that remains is to glue on the eyes and antennae, which can also be made from colored cardboard.

Volume cat.
Making a voluminous cat is simple and very quick. To make a cat, take:

Progress:
- In order to make a cat you will need a template. It is downloaded and cut out.
- Make 4 cuts in the template. They are made along marked, solid lines.
- The neck bends like an accordion and the tail curls.
- The paws along the line also need to be bent and glued to a piece of cardboard.

Finally
Now you know what crafts to make with preschoolers from colored paper. We hope that the above ideas are wonderful for you and that you will be able to get creative with your child in the very near future.


